

“Congratulations, you have just purchased one of the finest computers on the market today. It is well designed to assist you in solving the planing and navigating problems associated with flying. It is simple to operate and adequate instructions and formulas are printed on the computer so the user need not worry about forgetting how to work the computer”
Wow! I thought to myself, what reassuring words! Learning how to use an E6B is going to be a piece of cake!
The words in quotations above are the first words printed in the 50 page instruction manual that came with my E6B. If you fast forward five hours from the time I first read that quote you get this:

This small dent was created when I threw my beloved E6B across the room against a wall in frustration. The reason?
The reality of the E6B is that, although it is simple to operate, it is not an intuitive piece of equipment to learn. This is especially true for those of us who did not grow up in the slide rule generation; as that is exactly what the E6B is, a slide rule.
I made this post with the goal of providing a reference which could be used to learn the bulk of the essential E6B skills quickly and without frustration. I designed it to be read through and practiced in about 20 minutes, the same time it takes to become familiar with the electronic version.
For a printer friendly version without the blog fluff, Click here! You can also find it under the “pilot resources” tab
Enjoy!
Recommended E6Bs
I have listed the three most common E6Bs out there and their pros and cons:
- The Jeppesen Metal E6B – This E6B is my trusty companion and is the most commonly used E6B out there. It is strong, durable, and easy to use. The original E6Bs from the WWII era were plastic. One complaint of metal E6Bs is that the rivet which holds the circular center dial eventually wears out and allows the wheel to spin too freely. This is an easy fix if you lightly tap the center river with a hammer (after first removing the plastic on the back of course).
- ASA’s Color E6B Flight Computer
– ASA’s answer to the metal E6B is a little more durable than the Jeppesen model. It has some different charts than the Jeppesen and is a little harder to use
- ASA’s Paper E6B – Yes, its paper… but for 8 dollars, how can you go wrong? It will work just as well as metal E6B for half of the cost. Just don’t get it wet!
I am going to use a Jeppesen E6B for this write-up. Don’t worry if you don’t have a Jeppesen model. Modern E6Bs are essentially copies of the original 1940s design anyway!
Basic Parts
The E6B has two sides which are used to perform different tasks. The back side is used for calculating wind correction only (crab angle and groundspeed). The front side is used for everything else. The center metal piece that slides up and down and makes up the majority of the computer (labeled 5) is only used with the back side.
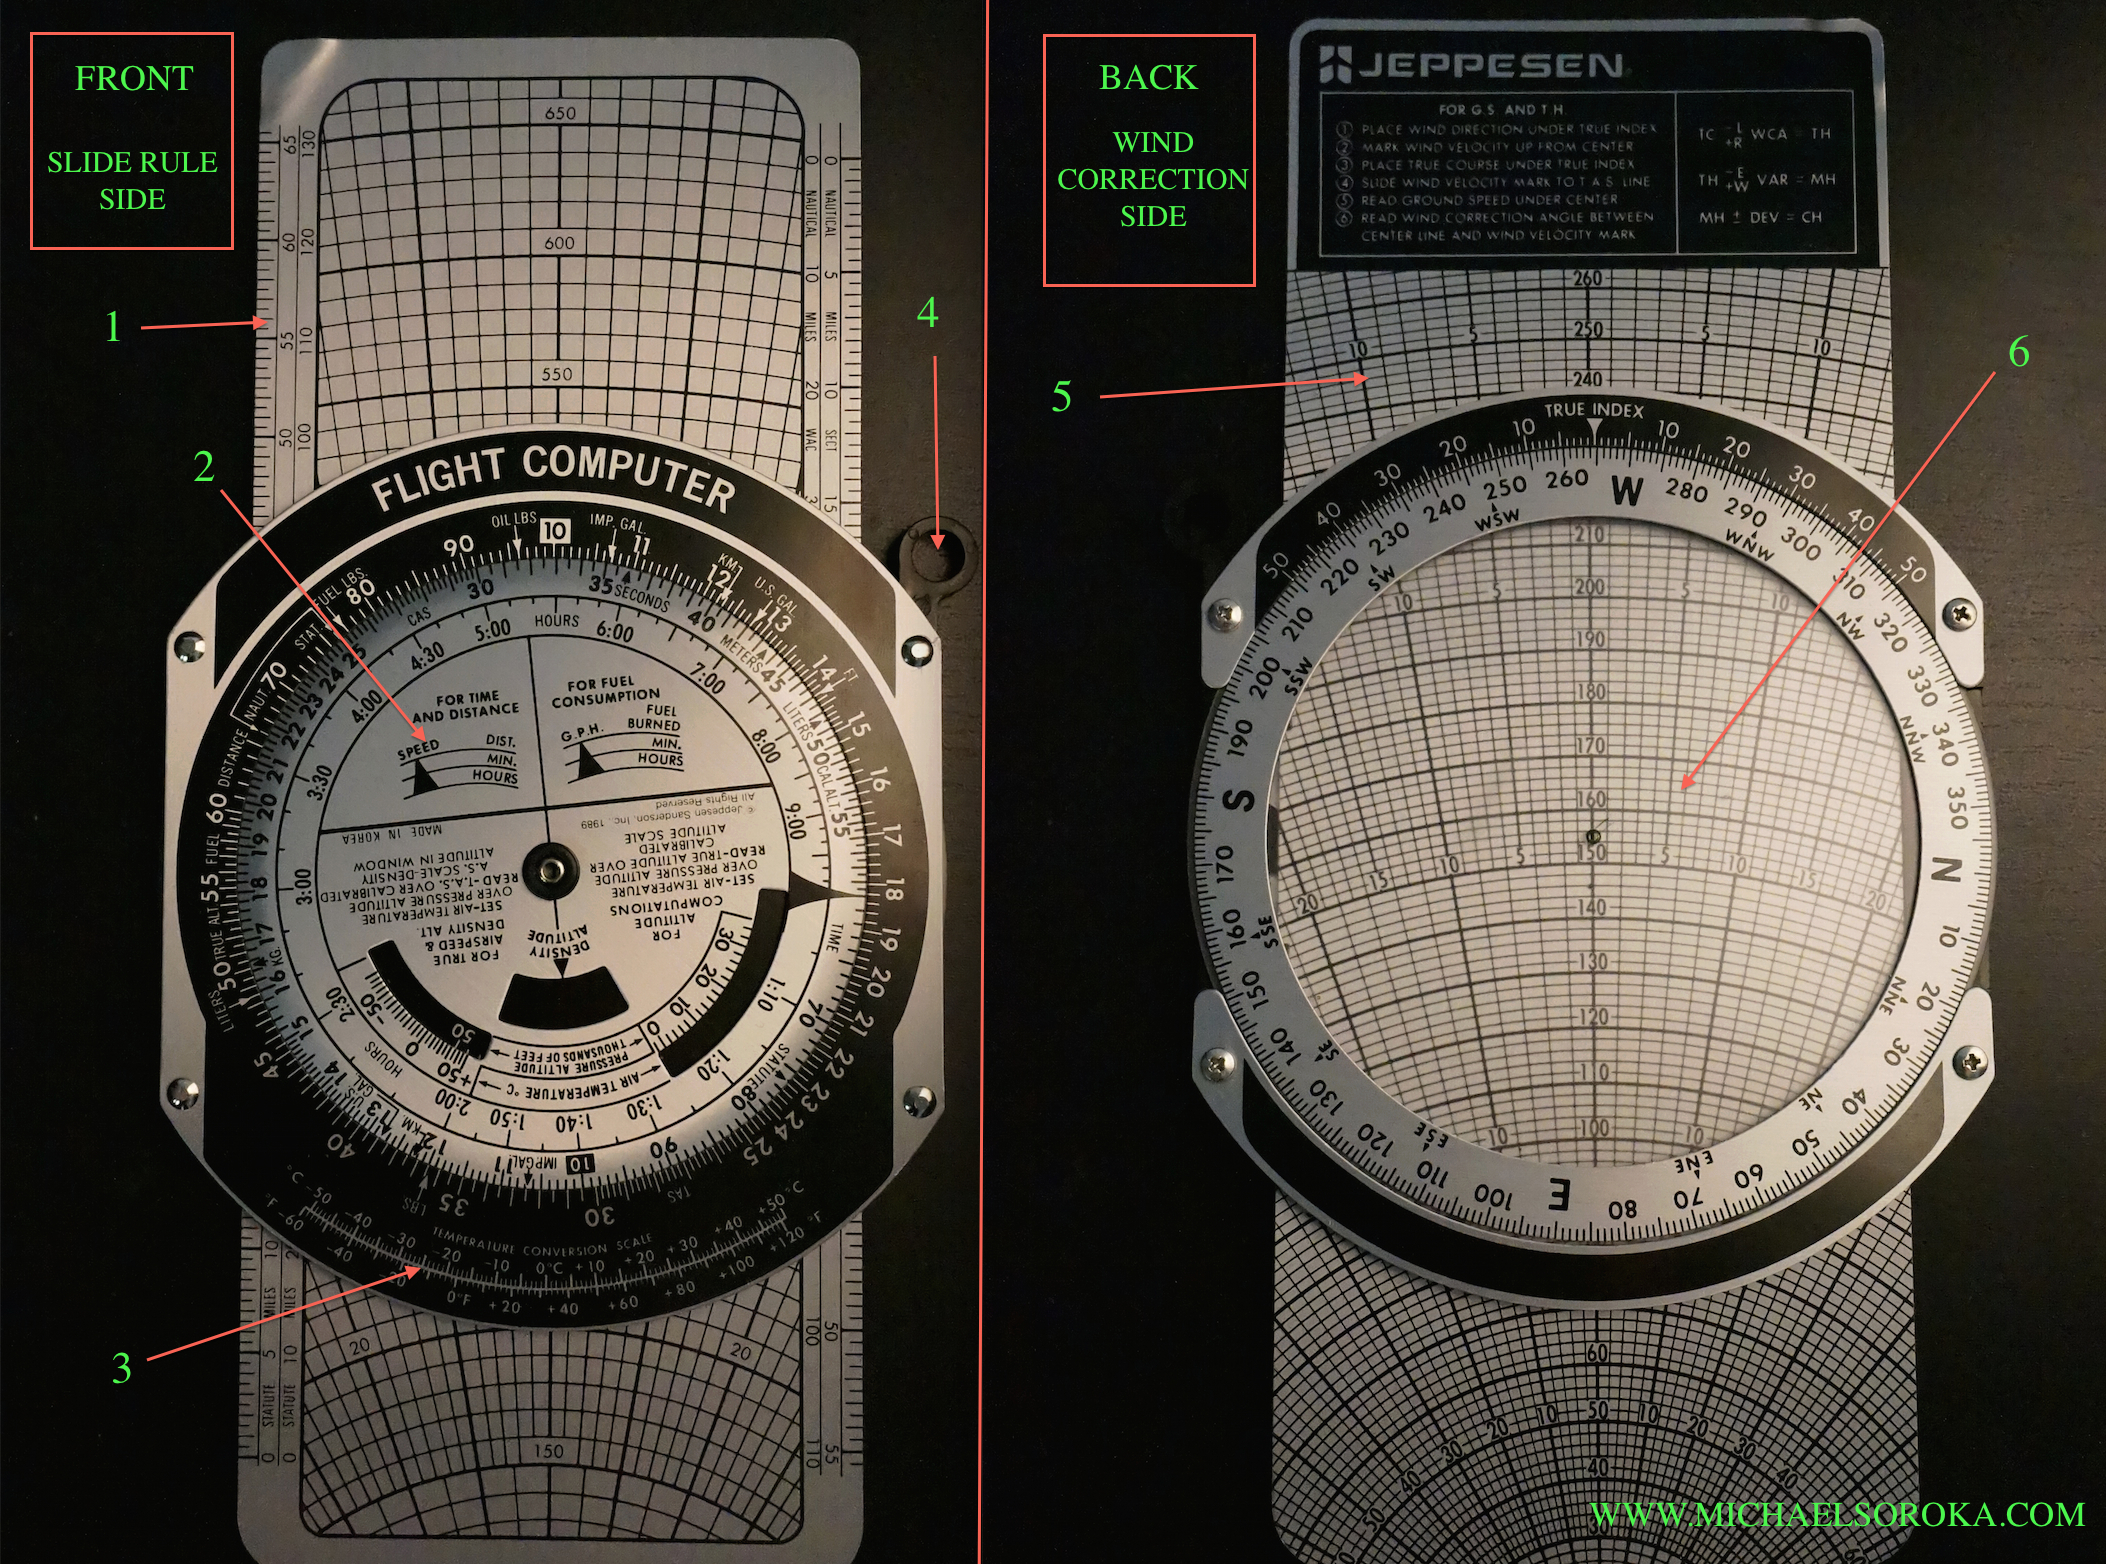
- Plotter (Has sectional and WAC scales)
- Rotating scale (What you input data with)
- Temperature conversion chart
- ??? If you take the time to read the instruction book, they never mention what this is for. Im assuming its so you can tie a string around your E6B, turning it into a necklace to be used as a fashion accessory on special occasions.
- Sliding chart for determining wind correction
- Rotating dial and pencil friendly writing surface for determining wind correction
Getting started
What you will need to use your E6B for:
As a flight student, you will need to use your E6B to perform a couple of different calculations. These can be placed into the three different task groups as follows:
- Fuel, time, and distance calculations (Multiplication and division)
- Wind correction – ie. Finding crab angle and ground speed (Trigonometry)
- Other – Finding TAS, Density Altitude, converting units, ext.
Each one of these three skill groups require a different technique to perform and can be practiced independent of each other.
1 – Fuel, Time, and Distance Calculations
Fuel, time, and distance calculations are performed on the front side of the E6B.
Becoming familiar with scales and pointers
Before actually getting into some problems, you have to learn a little about the parts of the E6B. First I will define the scales and the pointers, and then I will show you how to put them into action!
Scales:
The front side of the E6B is essentially a circular slide rule with three separate scales. These scales are named and highlighted below:
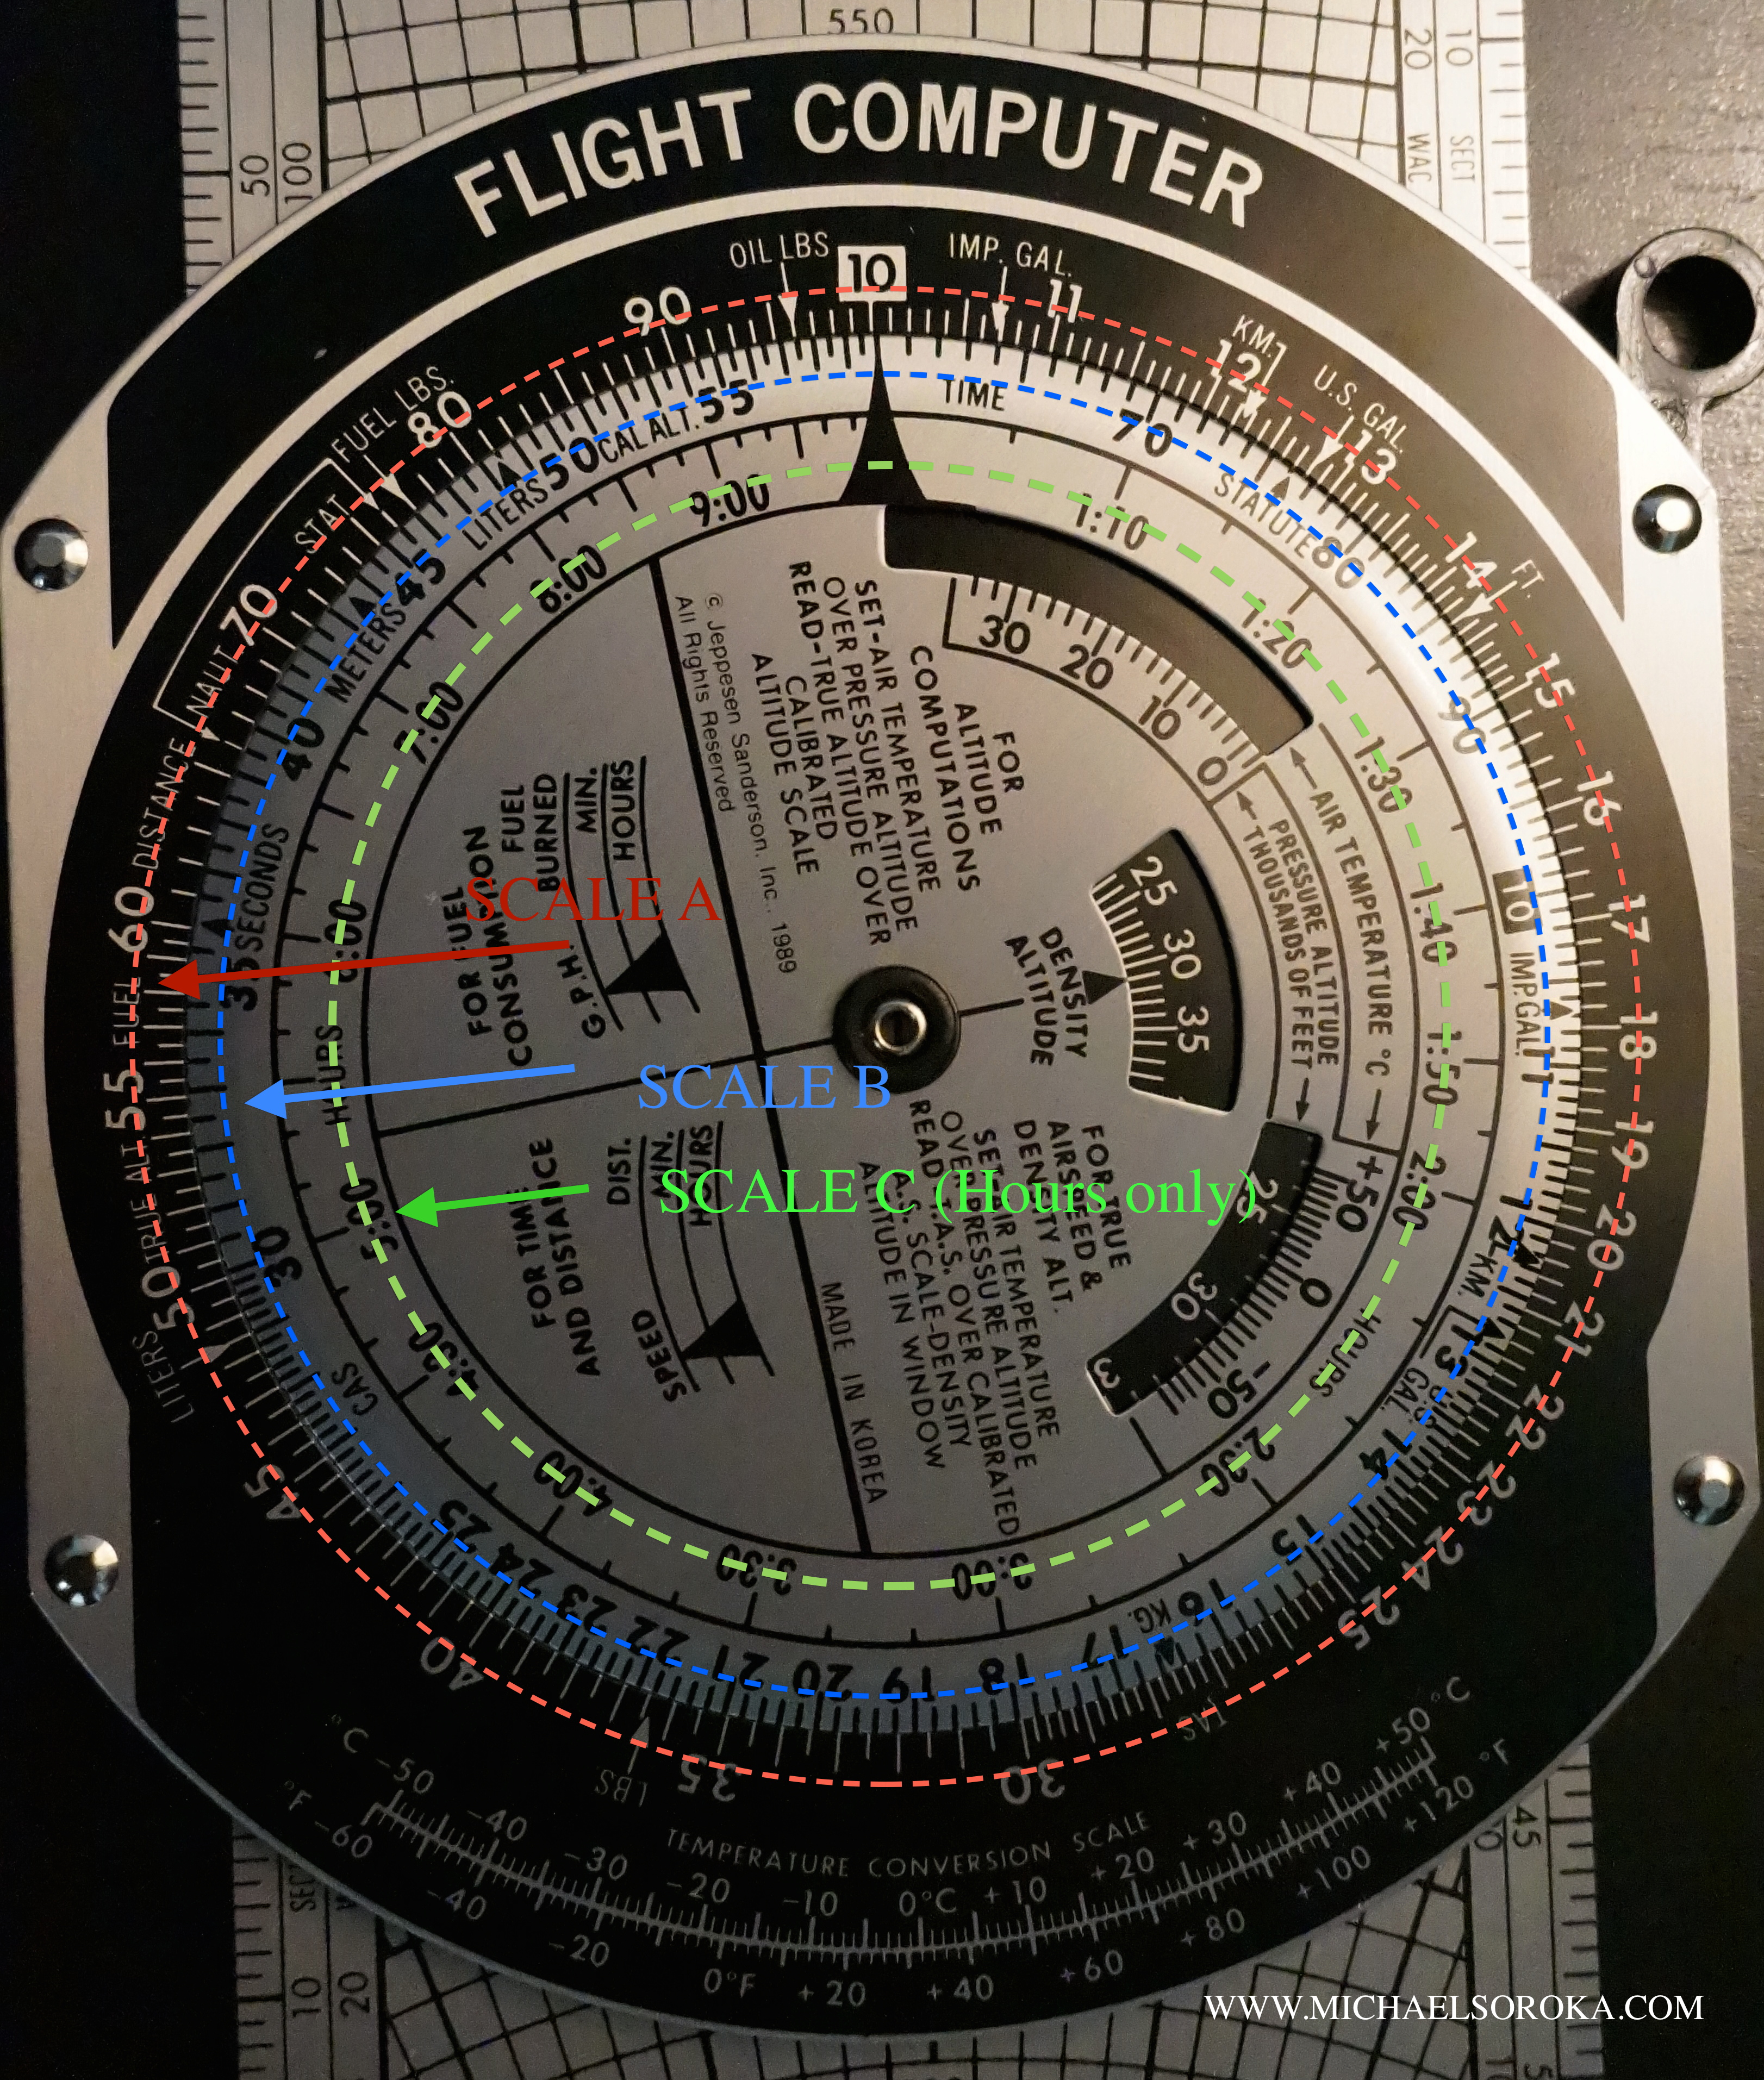
SCALE A – The outer scale marked in red has a few purposes. It provides a way to input and reference data with pointers (kind of like the buttons on a calculator). It is also where you will read all variables except time.
SCALE B – The middle scale is used to read time in minutes or seconds. It can also be used for multiplication and division.
SCALE C – The inner scale is only used to determine time in hours
Pointers:
Pointers are the input method of the E6B. Different pointers will give you outputs in different units or bases.
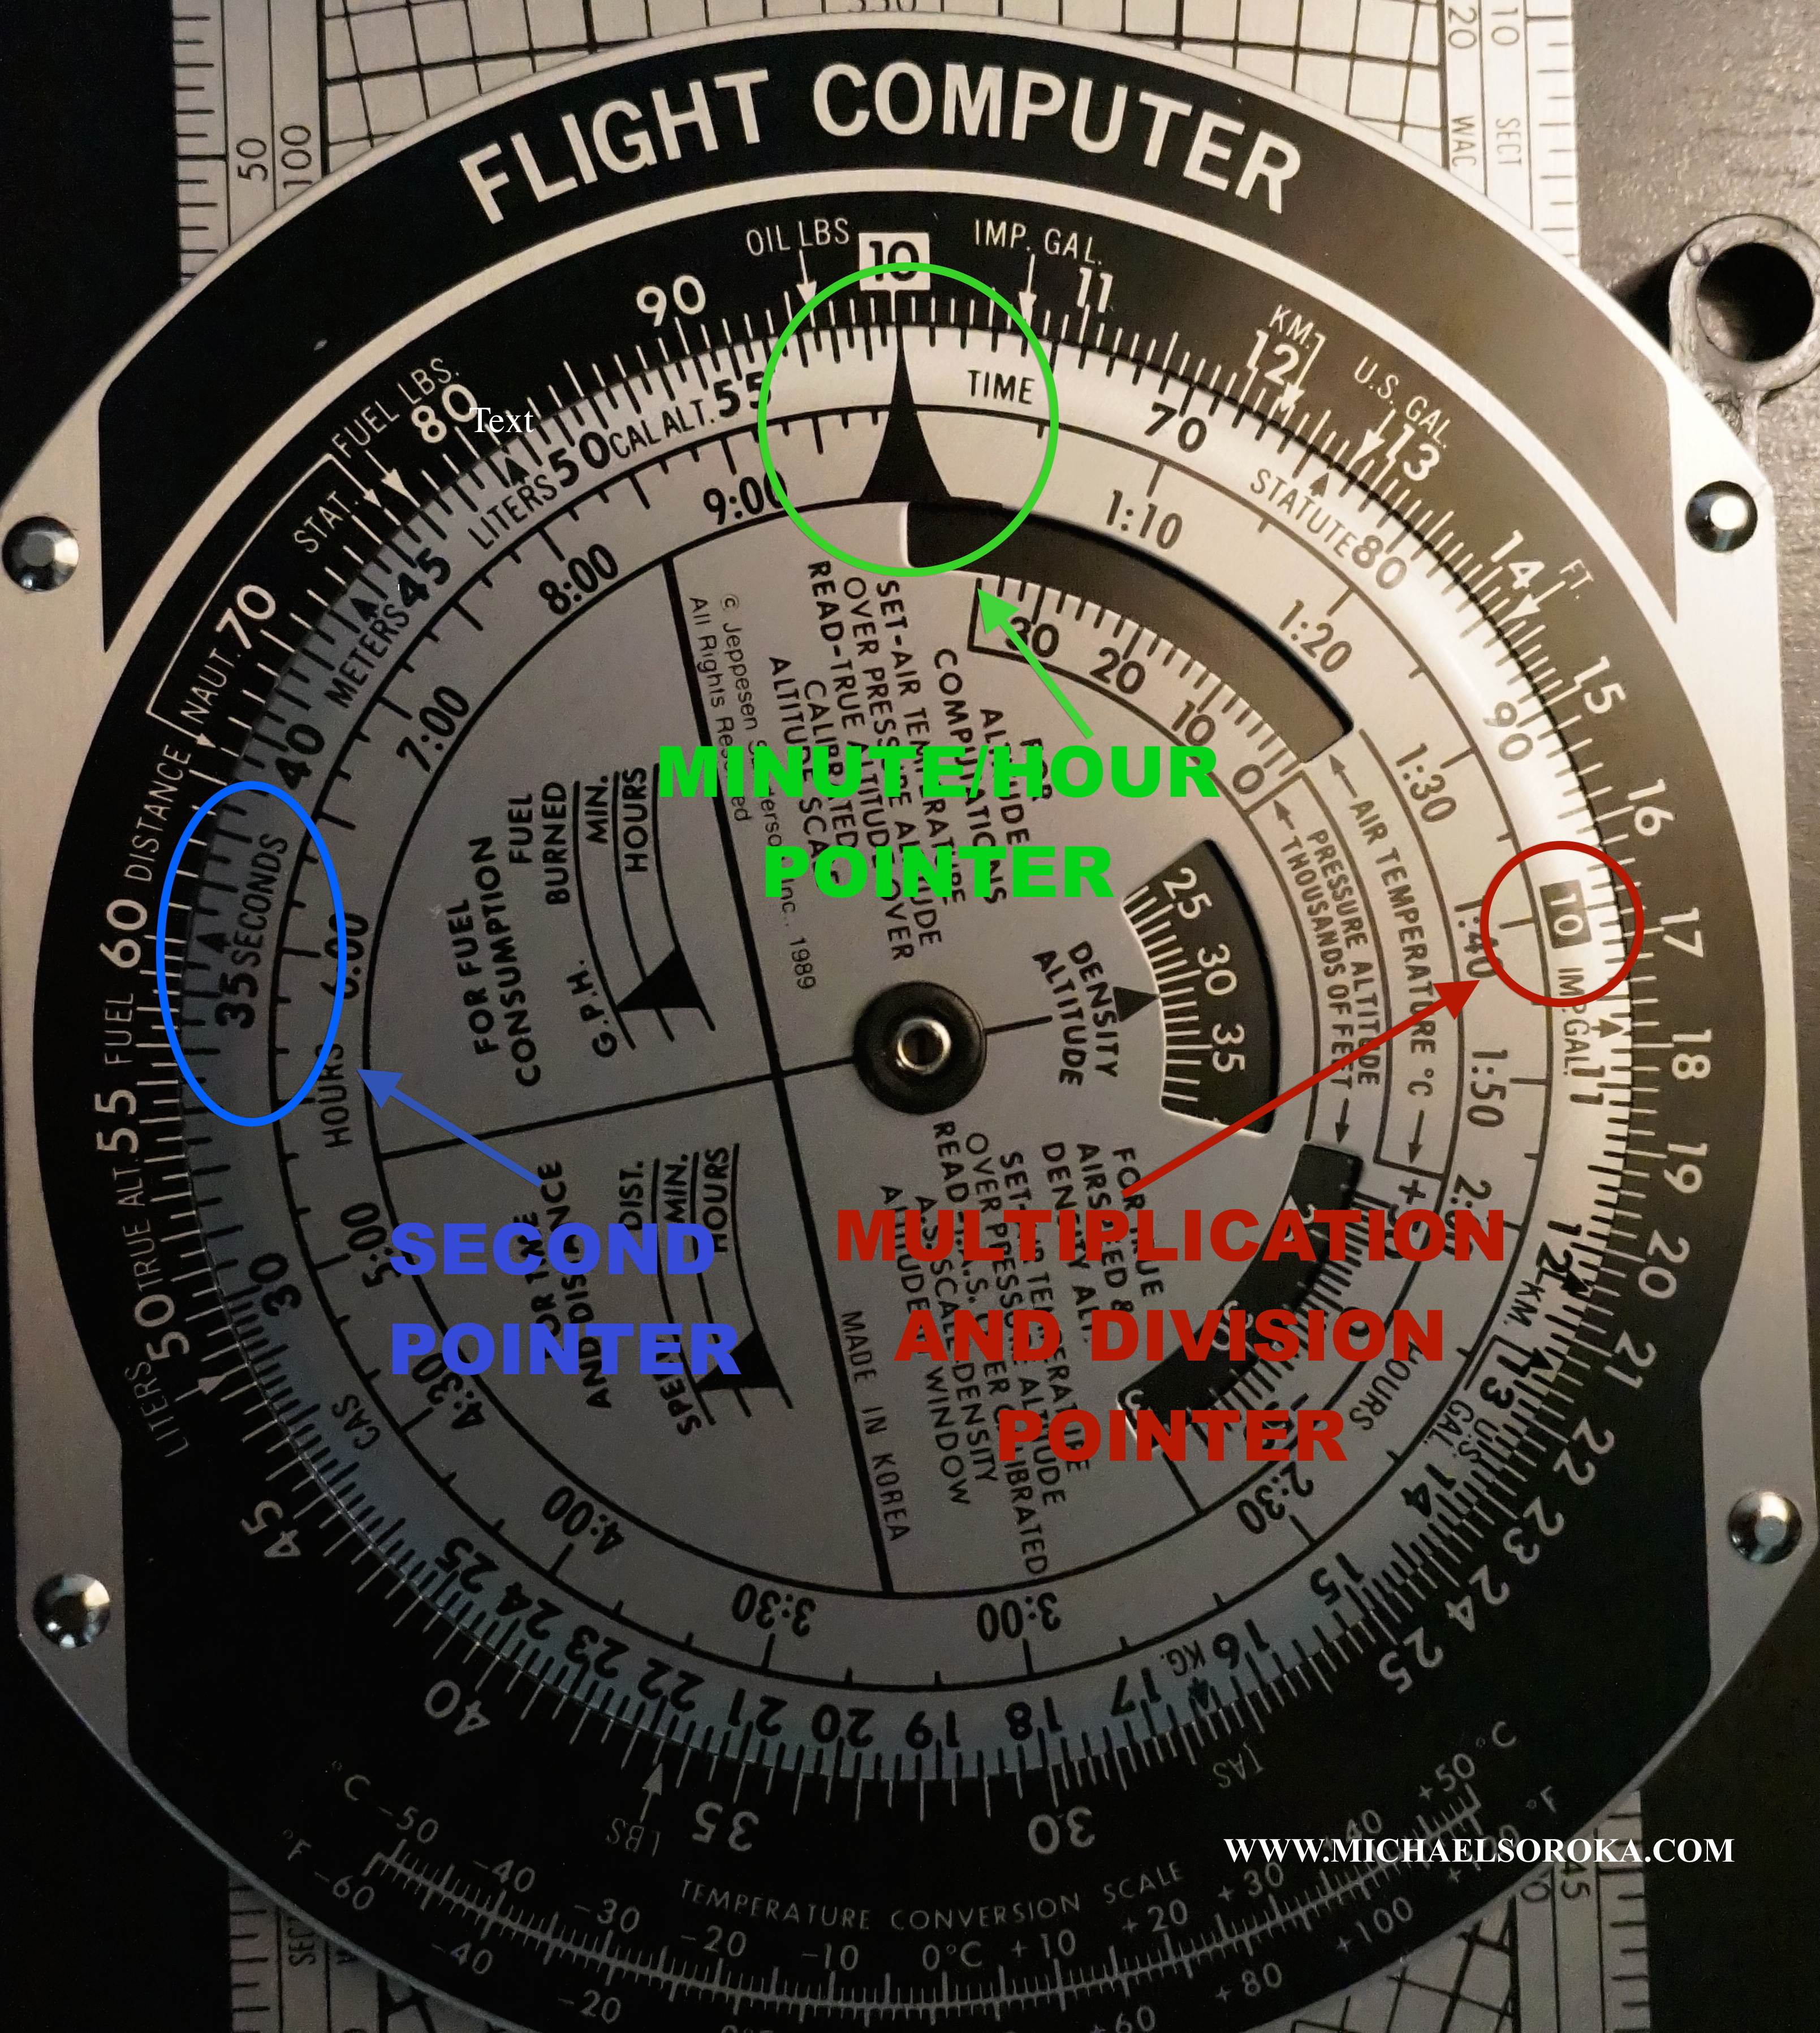
MULTIPLICATION AND DIVISION POINTER – This tiny pointer that extends from the center of the “10” in a black box is used to perform multiplication and division problems like 5 × 7 or 22 × 37.5.
SECOND POINTER – This little pointer above the “E” in SECONDS allows you work with seconds. It lies on the “36” because there are 3600 seconds in one hour.
MINUTE/HOUR POINTER – This big triangular pointer is the most commonly used pointer on the E6B. It allows you to work with minutes and hours or do anything in base 60.
Now some problems:
Ok, so now you are familiar with the three different scales on the E6B and the three different pointers. Its time to put them to work!
Multiplying and Dividing (Don’t skip)
I decided to show how to multiply and divide on the E6B first. Even though these are not the most common operations the E6B is used for, it give you a good idea of how the “brain” on the E6B thinks.
To multiply:
Rotate the MULTIPLICATION AND DIVISION POINTER to place the number you want to multiply with under Scale A. Then find the number you want to multiply by on Scale B. Read your answer directly above this number on Scale A.
Here’s an example:
What is 9×9?

Ok, I’m sure you have the 9 times tables memorized, but this is a great first problem to help you get used to the E6B.
You will immediately notice that the E6B doesn’t actually have a 9 on the A Scale or B Scale. It instead has the numbers 10-99 on it. One common feature of all slide rules, the E6B included, is that they do not account for order of magnitude. This is a good thing and a bad thing.
On the positive side, It means any number on the scale can represent any order of magnitude of that number. So, the 90 in the example above could be a 9, 90, 900, or 900,000,000.
On the negative side, it means that you have to know the expected order of magnitude of your answer. So, if I multiply 9 by 9, I need to know that the 81 output I receive is 81 and not 810, or 810,000,000. Conversely, if I were multiplying 90 by 90, my answer would be 8,100.
This will be a common theme for the rest of the problems.
Now try a problem that’s a little harder to do mentally:
22×35=?

Remember to apply proper order of magnitude. 22 × 35 is 770 not 77 or 7700.
I’m sure your thinking… Wow! what a handy tool. Now try an aviation related problem:
On a cross country flight, you climb at 650 feet per minute for 7 minutes. How much altitude did you gain?
650fpm × 7min = 4550ft
Again watch order of magnitude and apply logic as necessary. Your Cessna probably gained more than 45.5 feet but didn’t zoom climb to FL450 in 7 minutes. As your E6B skills improve, you will be able to do problems like this much faster than you could with a calculator.
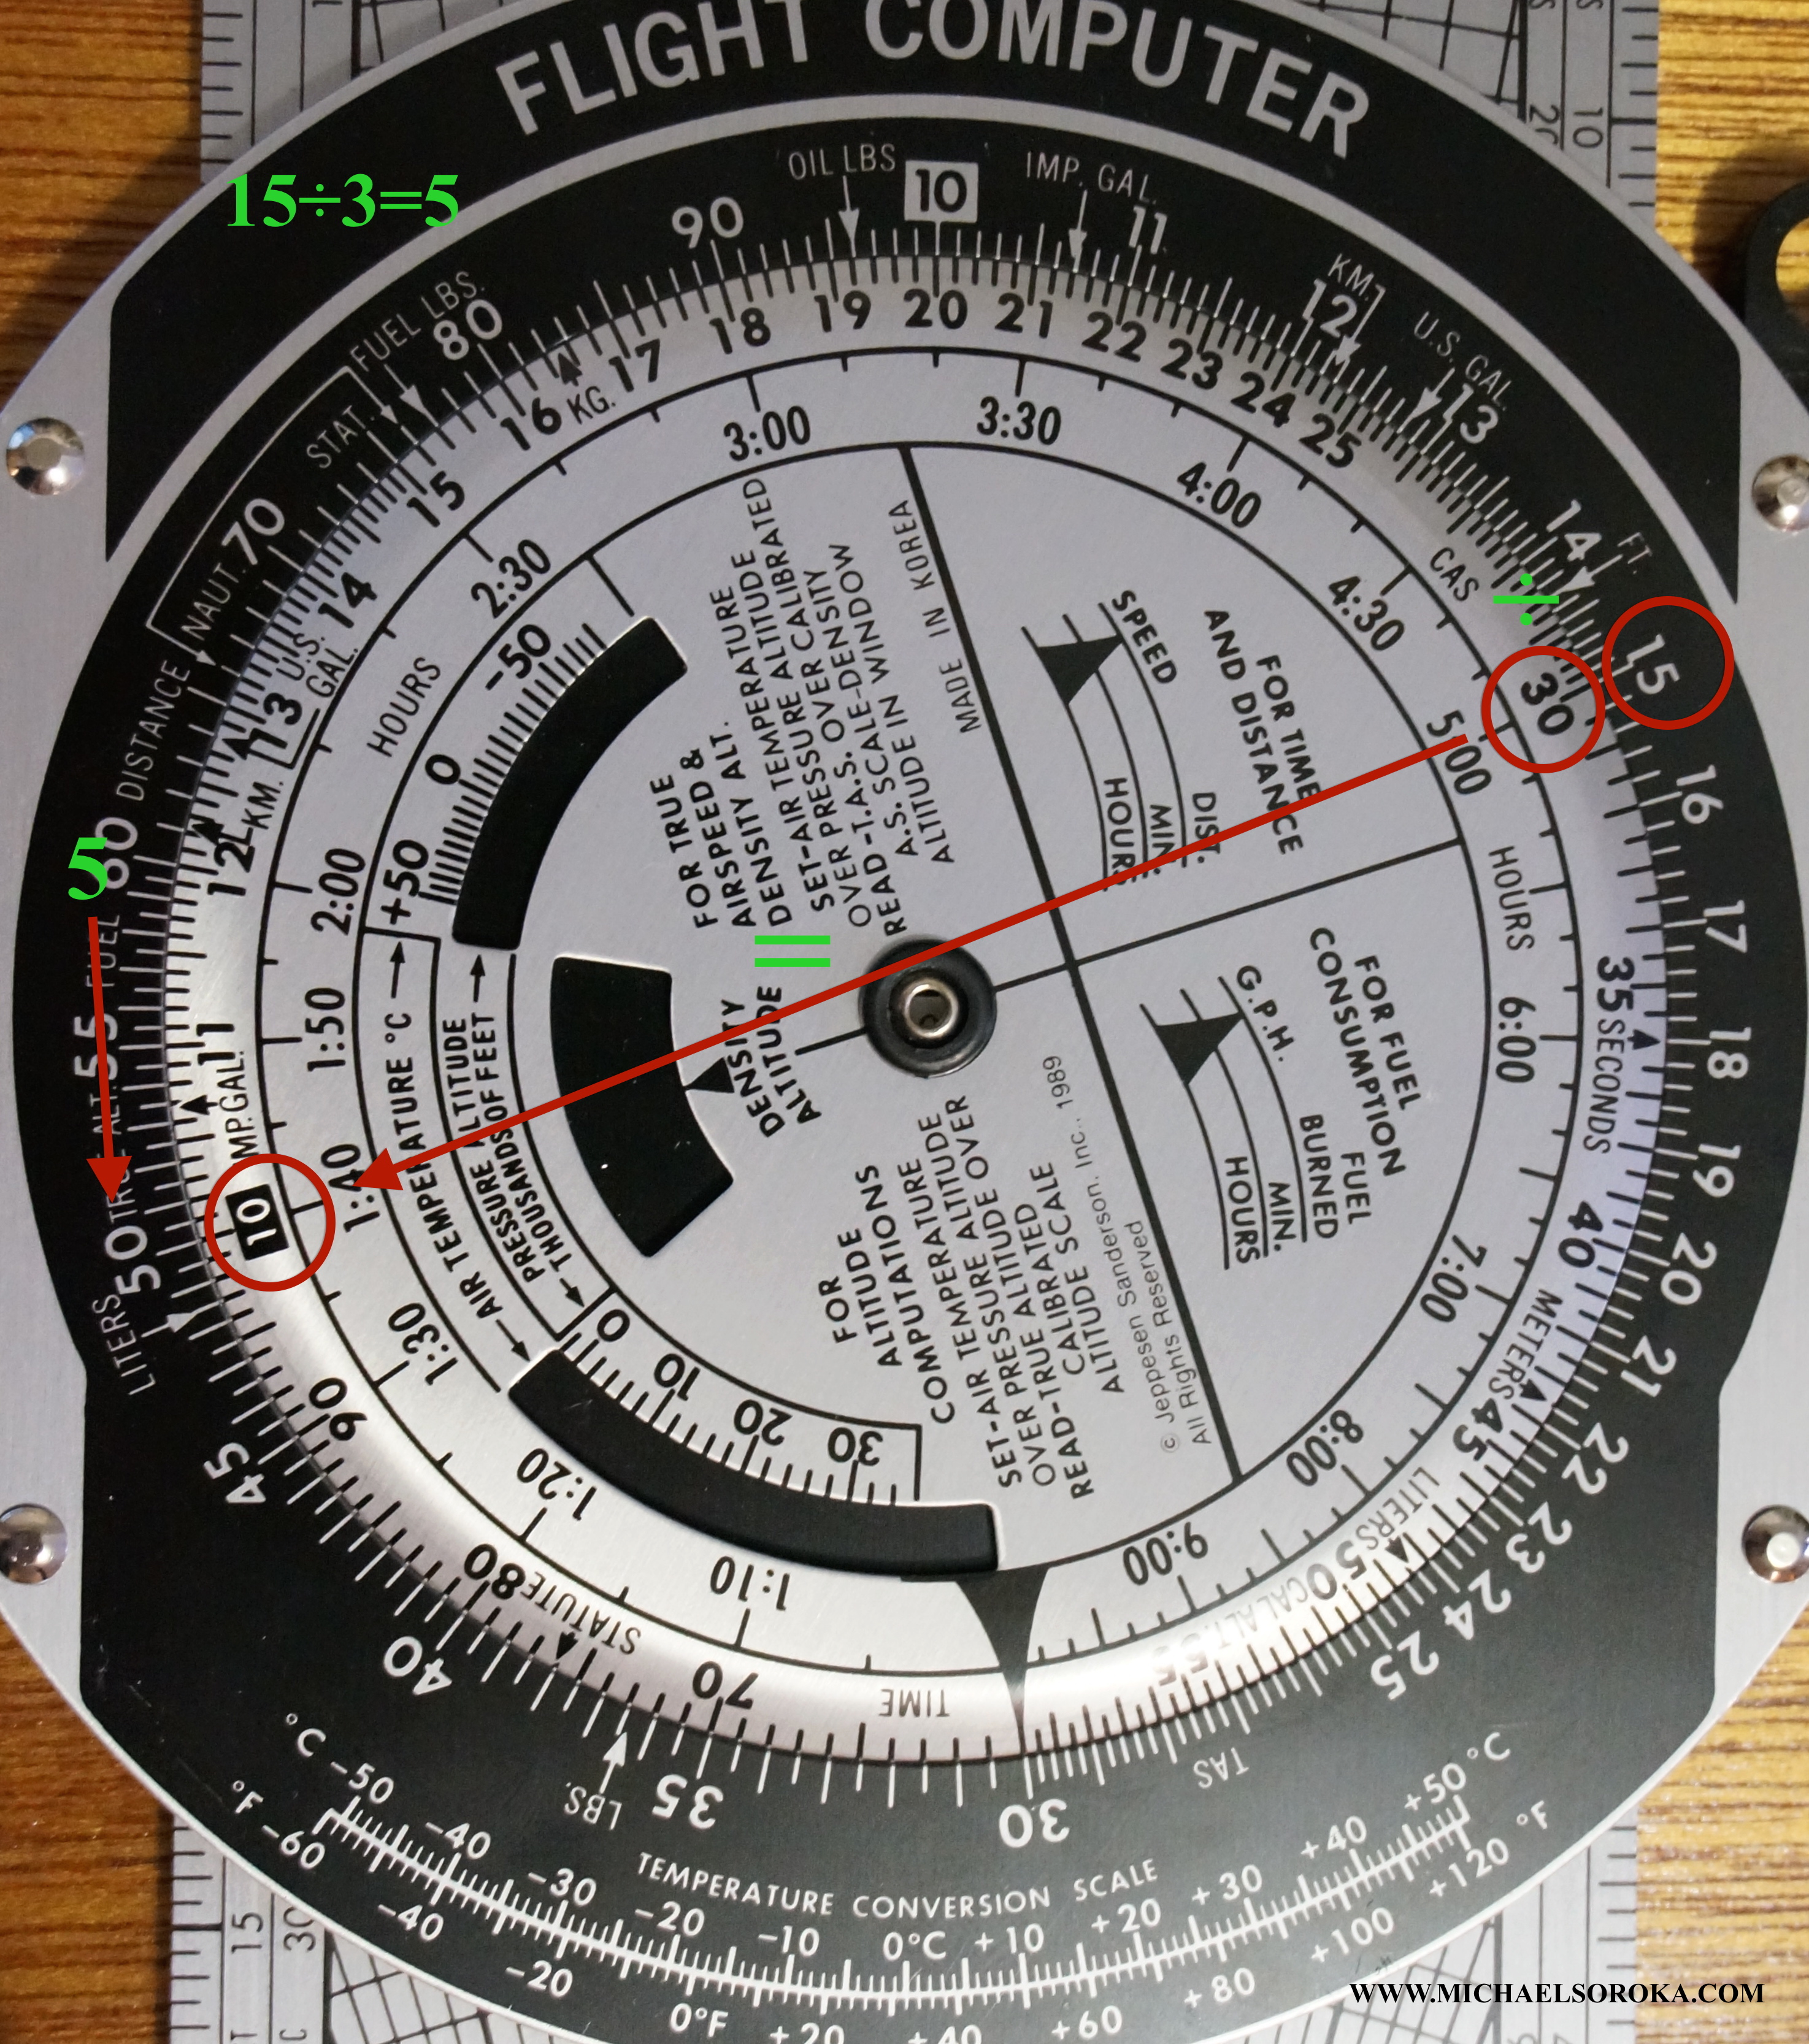
To divide:
To divide with the E6B, use the multiplication technique in reverse:
Rotate the wheel to align your numerator on Scale A with your denominator on Scale B. Read your answer at the MULTIPLICATION AND DIVISION POINTER. (or simply put the numerator over the denominator and read off of the pointer)
Ex: 15 ÷ 3=?
Now try these division problems:
60 ÷ 25 = ?
2.4
You need to descend 5,000ft in 7 minutes. What descent rate will you need?
5000 ft ÷ 7 min = 715fpm (approximate) – The E6B can only handle two non-zero digits in its answer. The rest are approximated in the scale.
Time between 2 points at a given ground speed (leg time)
This is a common operation that needs to be done to fill out a Nav log or during a diversion in the air.
Typically, time is though of in seconds, minutes, and hours rather than percentage of hours (1:20 rather than 1.33 hours). Because this is a base 60 system, the multiplication pointer wont work for most problems.
Luckily, the E6B also has a Minute/hour pointer and a Second pointer.
Before you start a leg time problem, you must first ask yourself: Is going to take hours, minutes, or seconds to get between these two points? This will tell you which scale and which pointer you will need to use.
Let’s start with minutes as it is the most commonly used time unit on Nav logs:
Here’s the problem: At 110kts ground speed, how long will it take you to travel between two checkpoints that are 18nm apart?
Because it will take “minutes” to go between these points, use the Minute/hour pointer. Point the Minute/hour pointer at the ground speed. Find the distance on scale A, and read the answer off of Scale B directly across from the distance.

You will get an answer of 9.8 minutes.
It’s up to you to decide what you want to do with a number like this. Unfortunately, the E6B will not return an answer in minutes and seconds. It only works in whole units for minutes. You can either round your answer up or down (9.8 min to 10 min), or multiply the remainder by 6 to convert to seconds (8×6=48 so 9:48)
The nice thing about the mechanical E6B for these types of problems is that it does not have to be rotated again to calculate different legs if the ground speed is unchanged. This is especially useful for filling out Nav logs and makes the mechanical E6B much faster than its electronic counterpart.
Hours between legs
If you suspect it will take hours between legs, the method is the same except: You will still use the Minute/hour pointer, but will use Scale C instead of scale B.
Ex: How long will it take to fly 320nm at a groundspeed of 120kts?
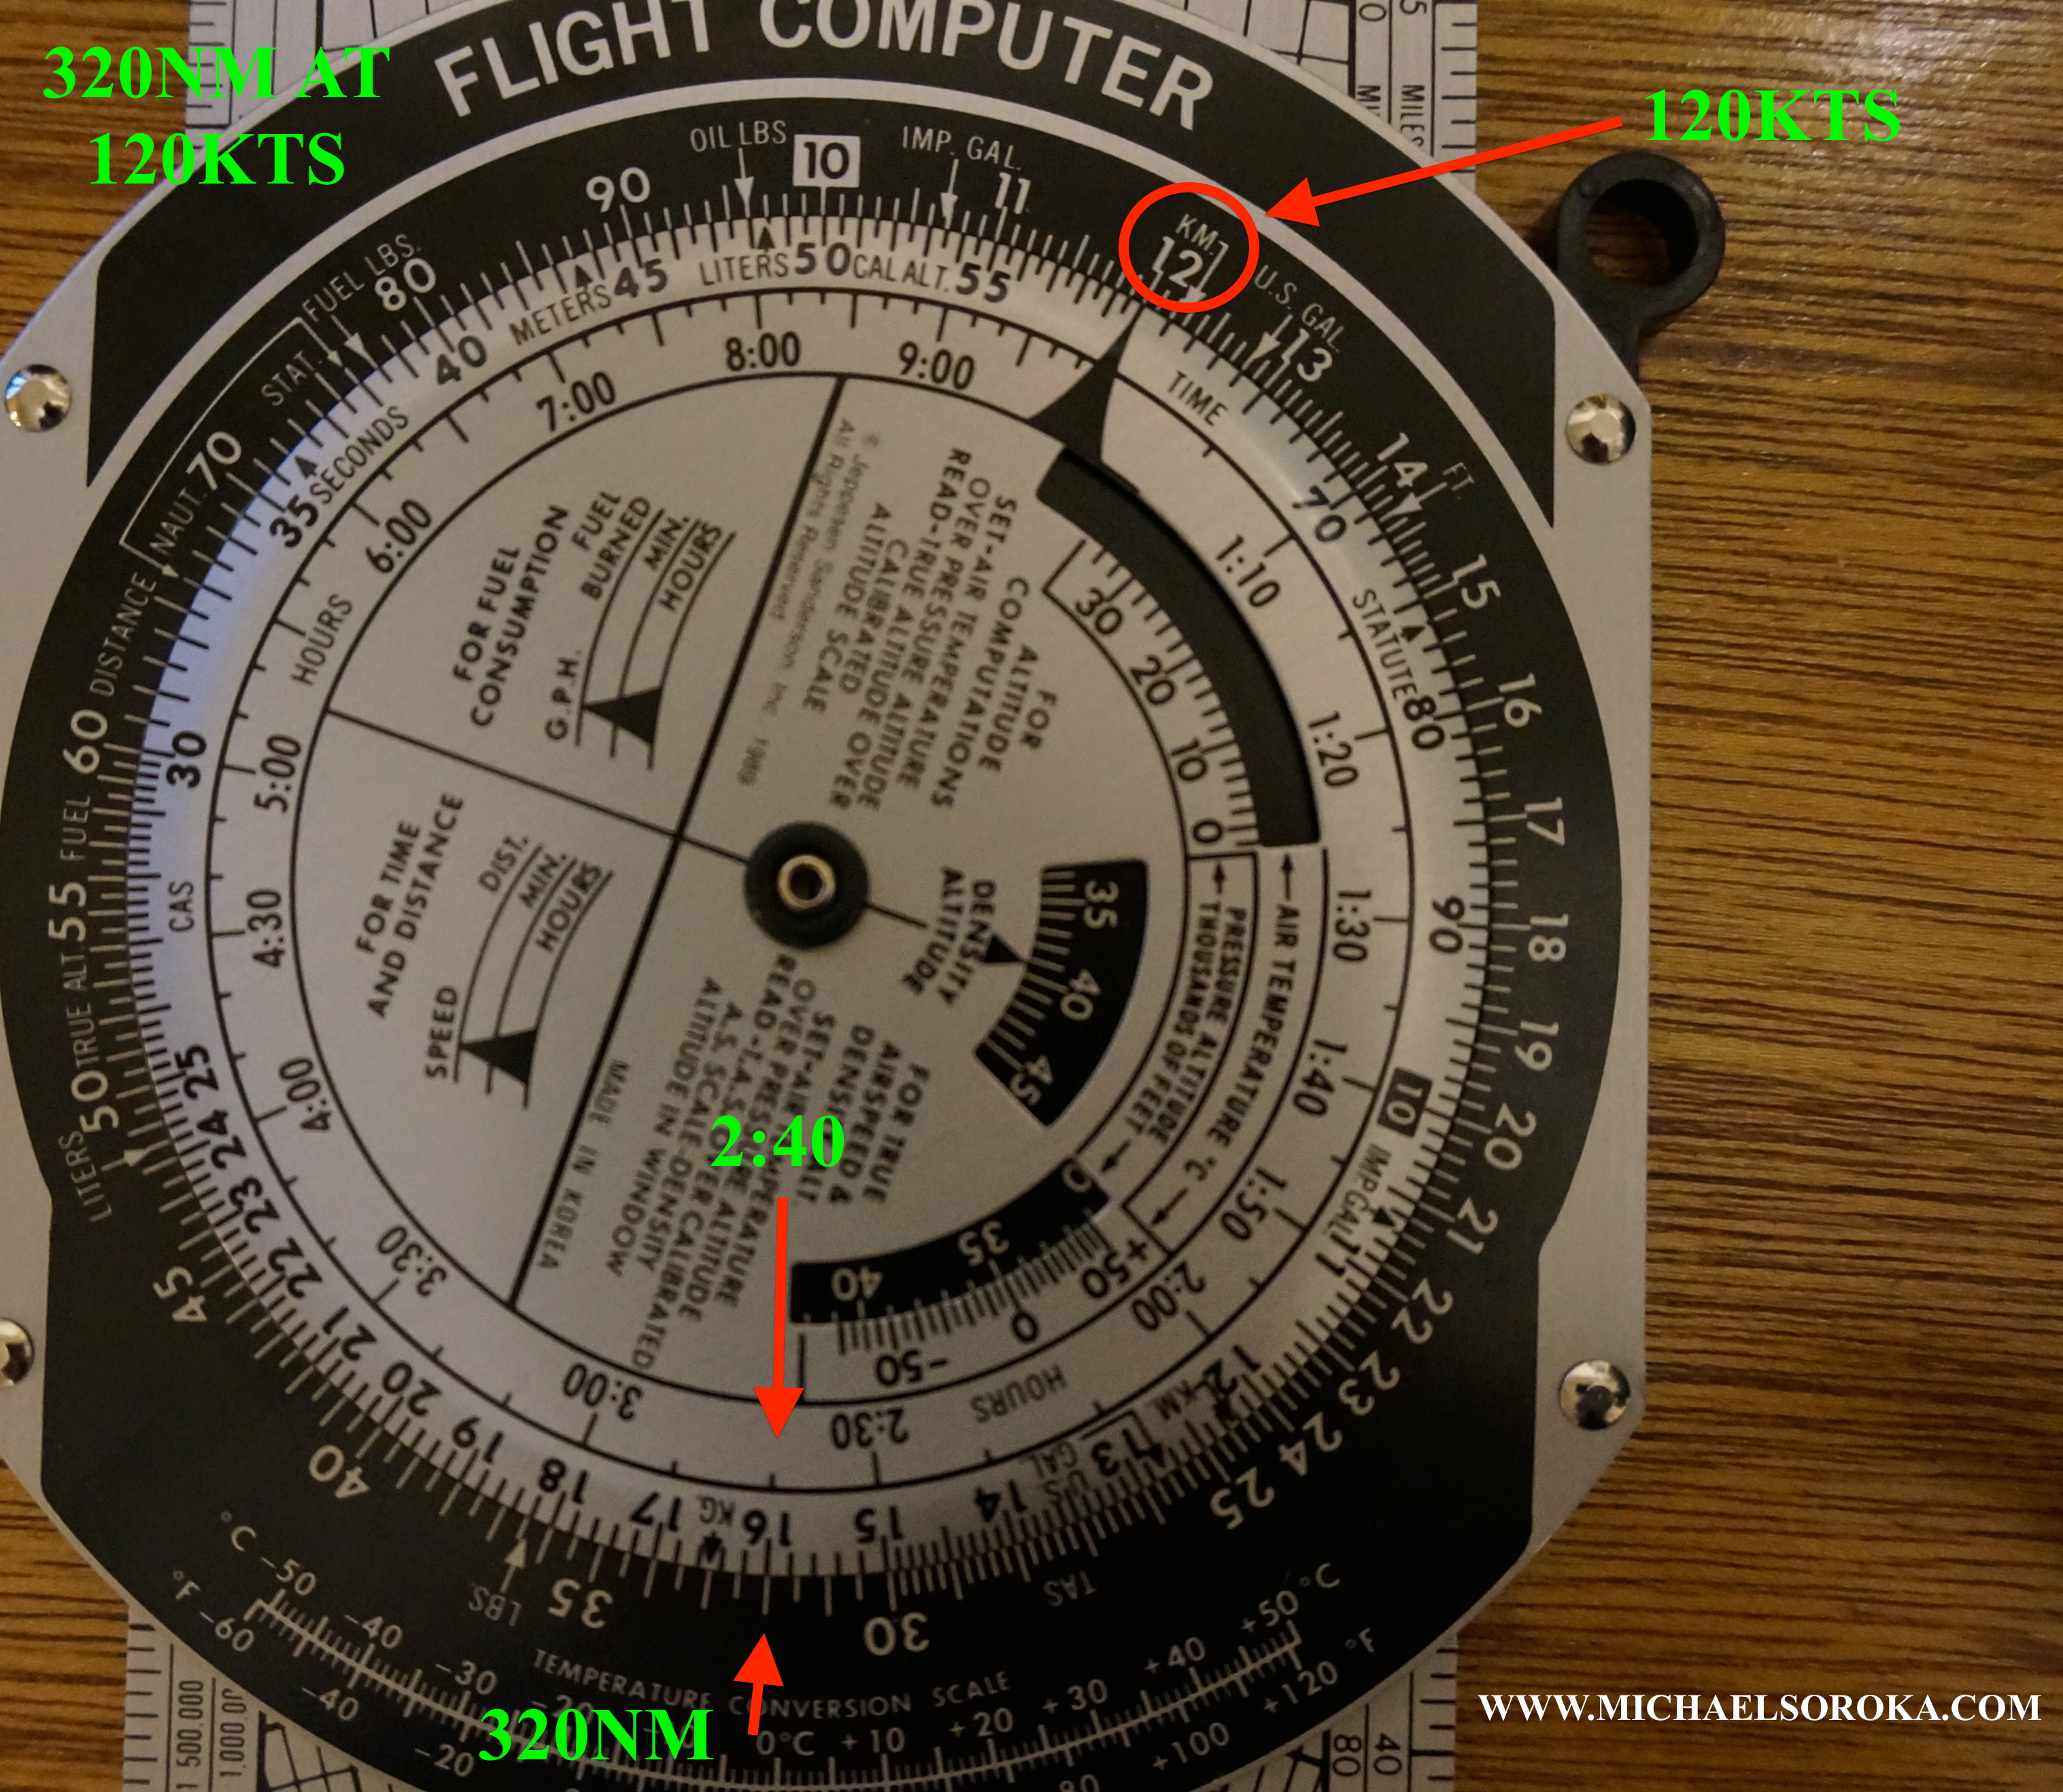
You should get 2:40
Leg time in seconds
If you suspect it will take seconds between legs, the method is the same except: You will use the Second pointer instead of the Minute/hour pointer and will use Scale B.
Ex: How long will it take to fly 1.2nm at 140kts?
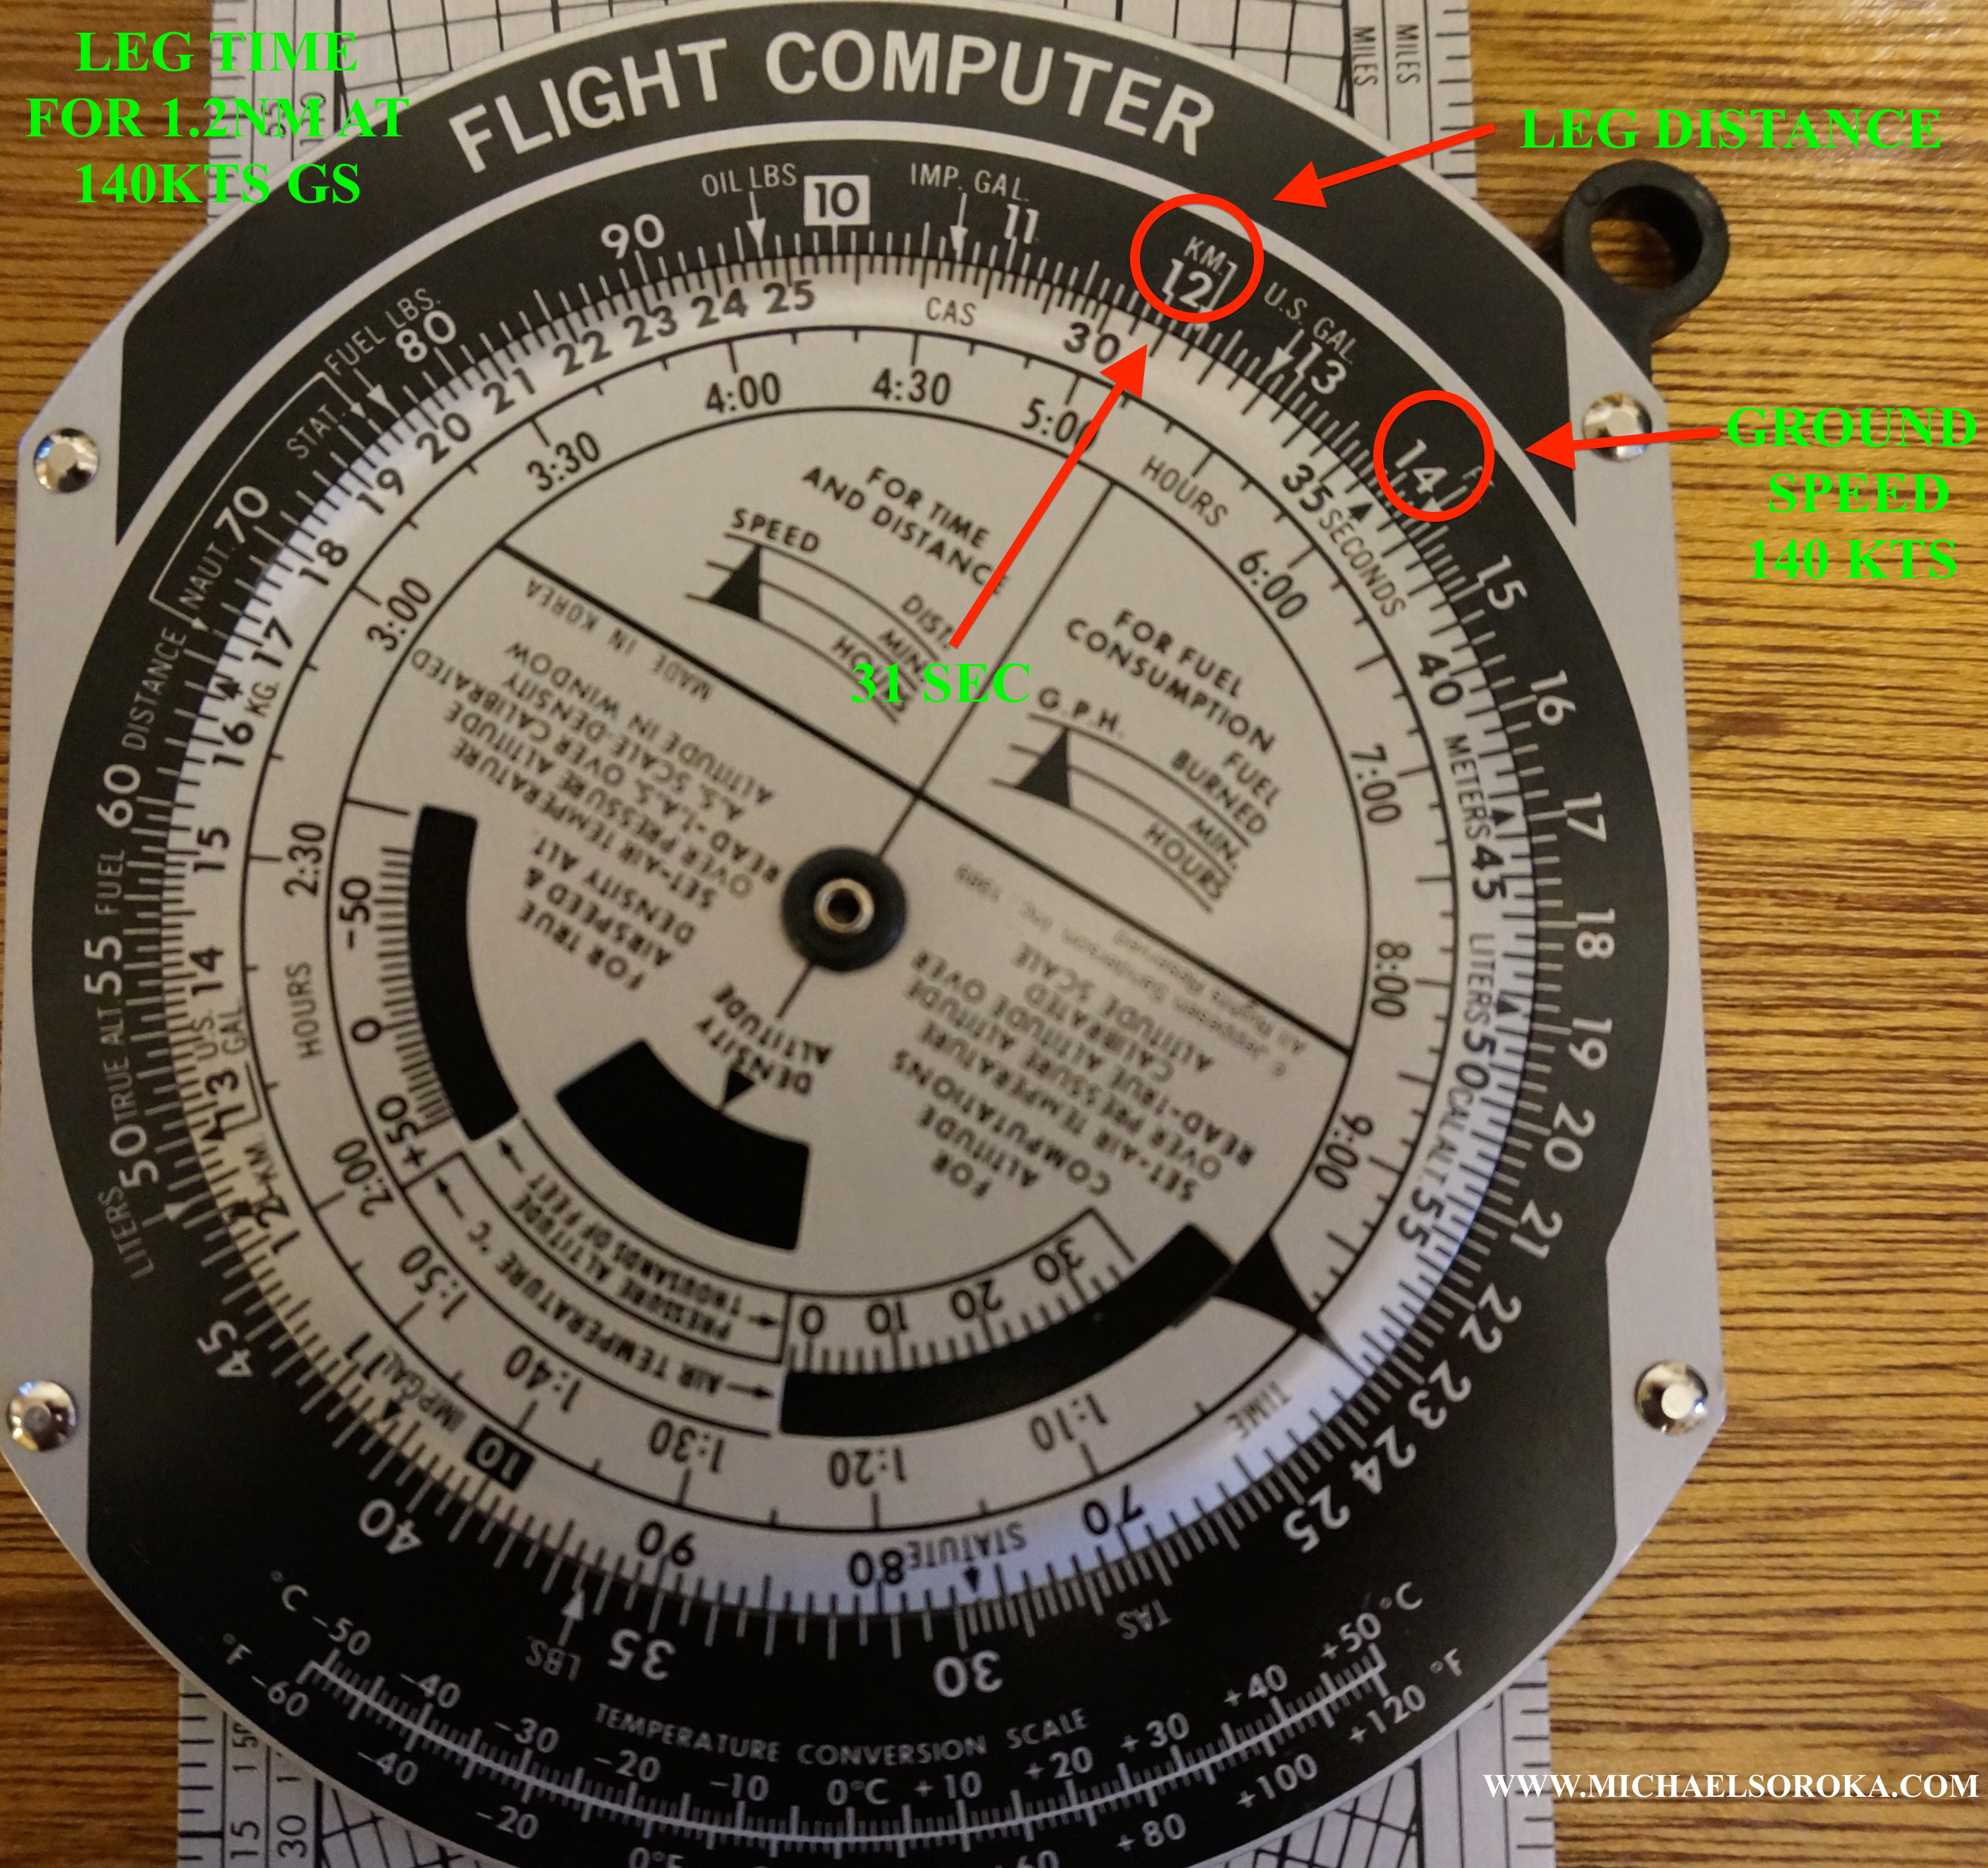
You should get about 31 seconds.
Working in reverse to find ground speed and distance
You can work in reverse to find ground speed for a known leg time and distance, and distance for a known leg time and ground speed using the following methods:
Groundspeed: Align the distance you traveled on Scale A with the time you traveled on either Scale B for minutes or Scale C for hours. Read you groundspeed off of the pointer.
Distance: Align the pointer with the groundspeed. Find the time on Scale B for minutes or Scale C for hours. Follow the time directly across to Scale A to get the distance traveled.
Fuel for a given leg
The procedure for determining fuel burn for a given leg is similar to finding leg time. Like leg time, the pointer and scales you use will be different if you are working with seconds, minutes, or hours.
To calculate the fuel burned for minutes or hours of flight time, use the Minute/hour pointer and point to the the fuel burn in GPH. Find the leg time on either Scale B for minutes Scale C for hours. Read the fuel burned directly across on Scale A.
For seconds, use the Second pointer and Scale B
Ex: How much fuel will a Cessna 152 burn on an 8 minute leg with a fuel burn of 5.3 GPH?
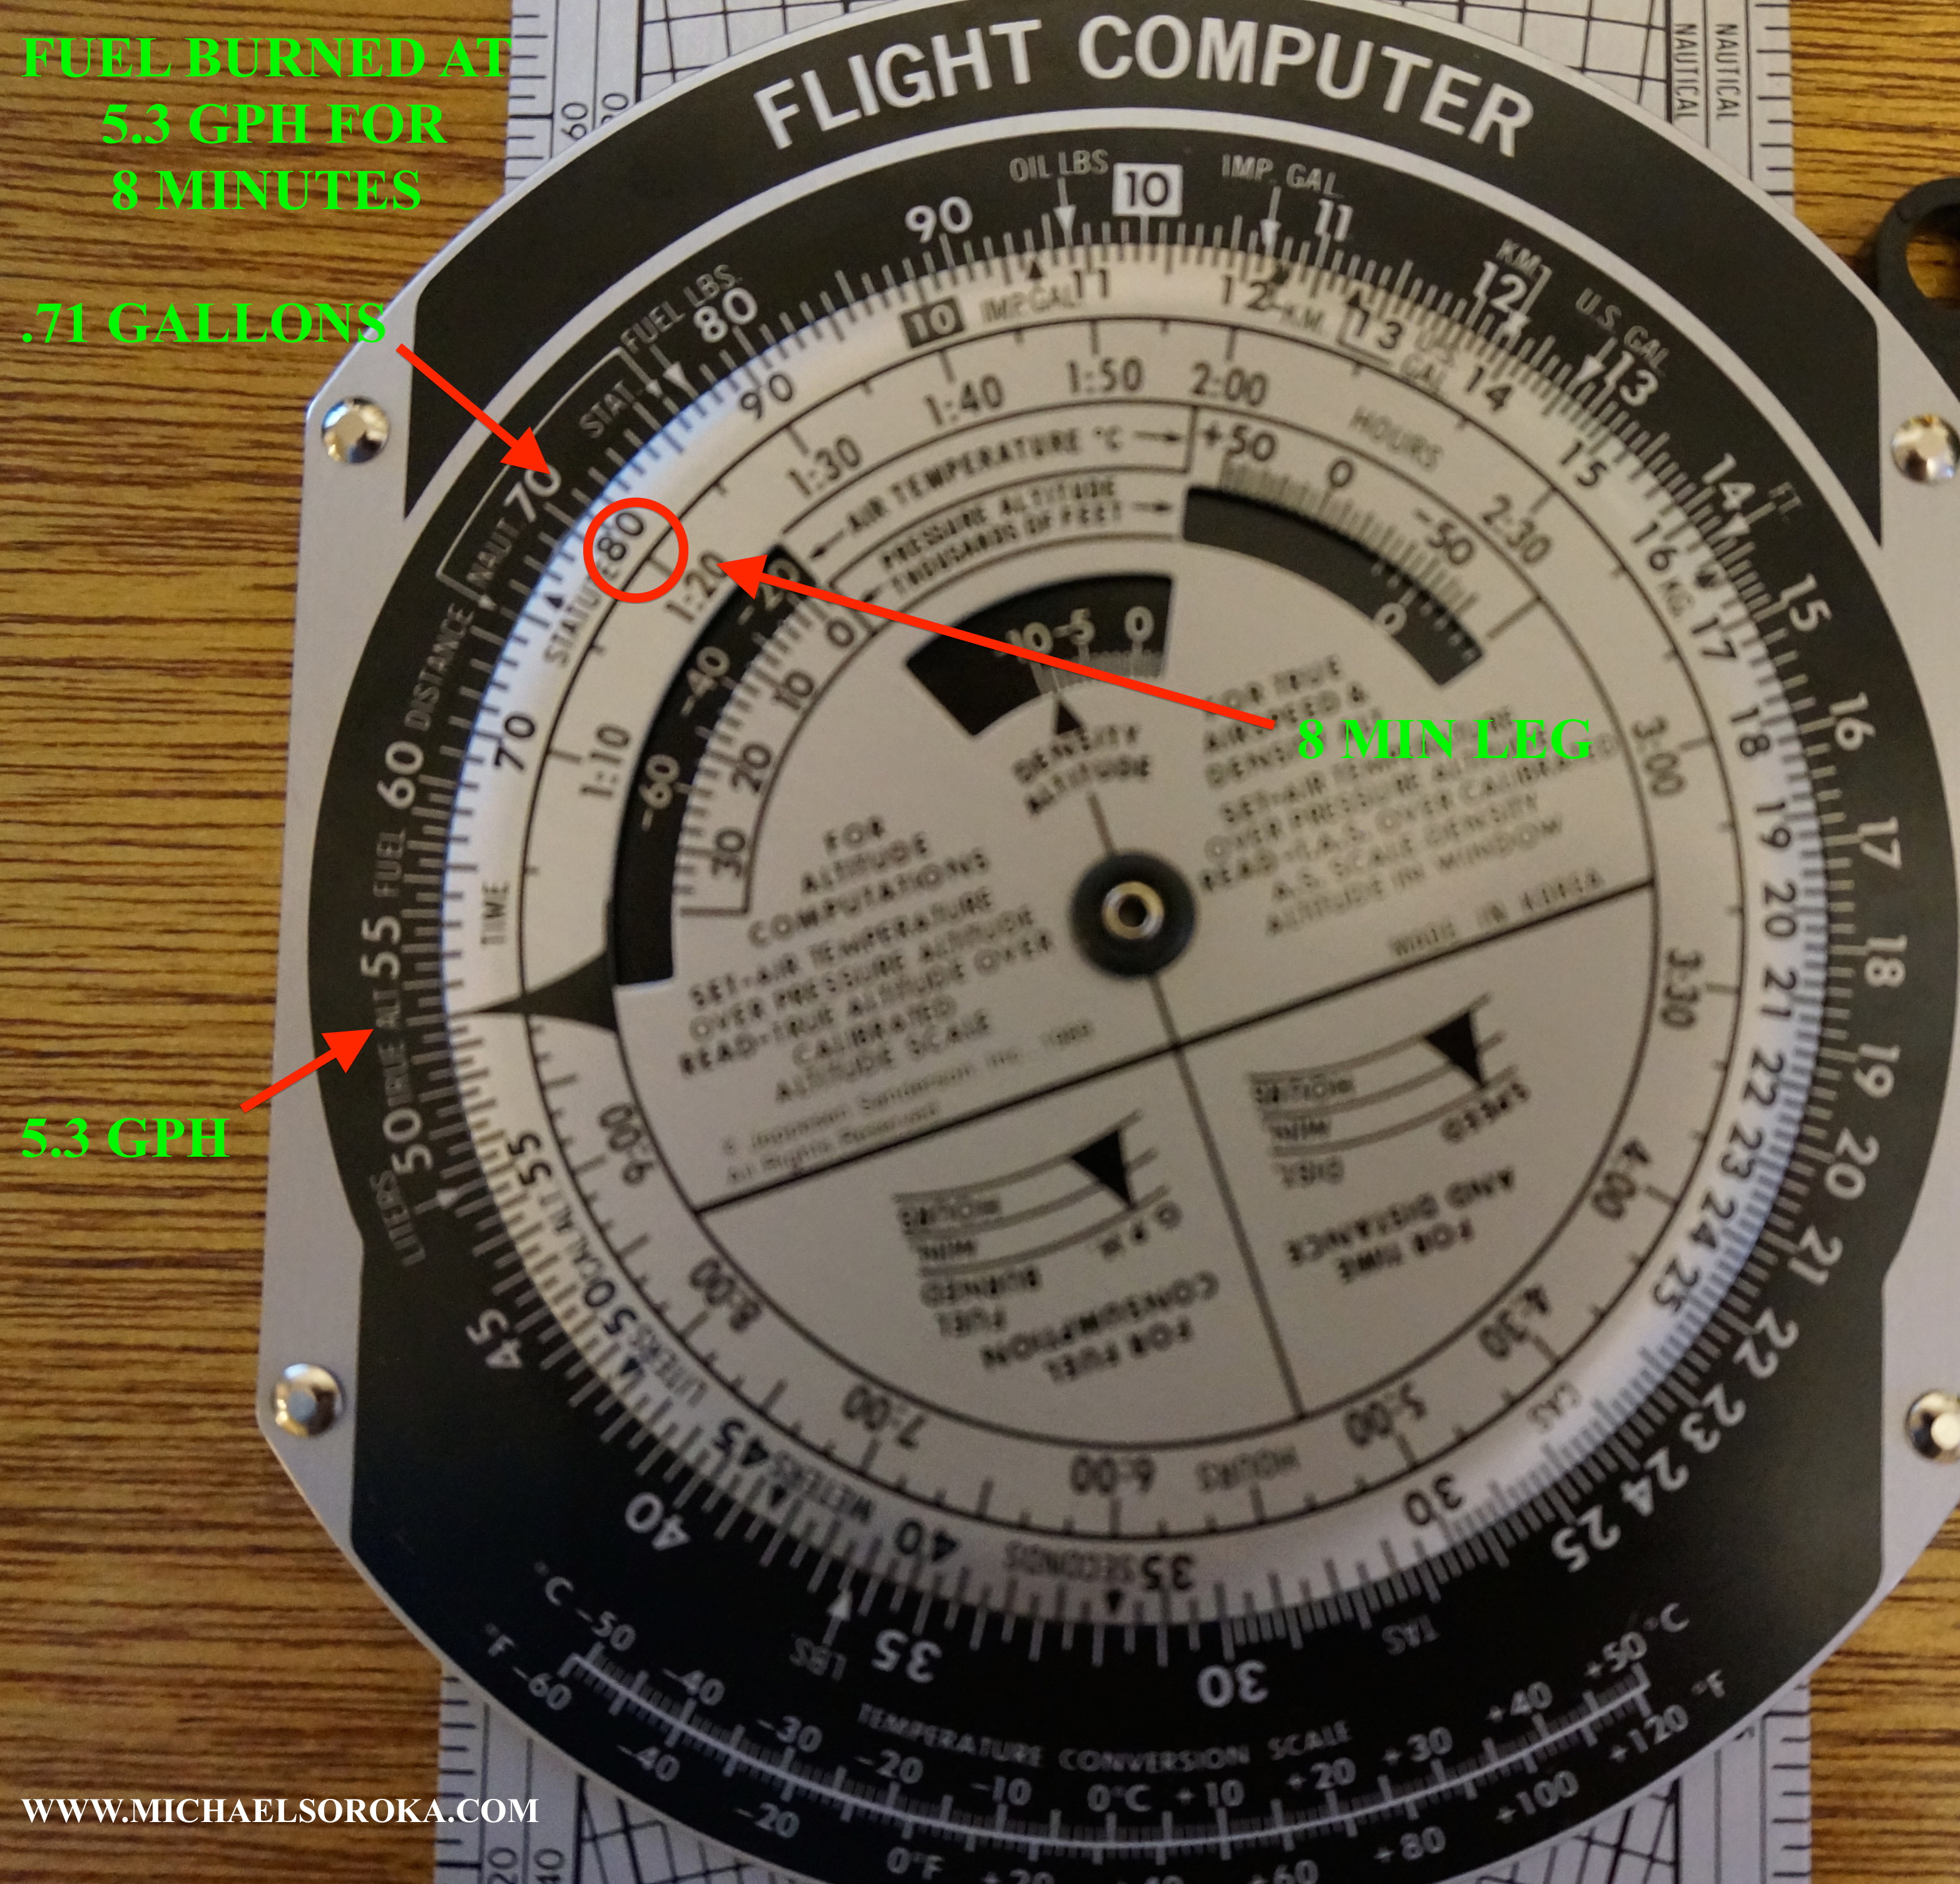
You should get around .71 gallons.
2 – Crab Angle and Groundspeed Adjusted for Wind
To find crab angle and groundspeed adjusted for wind, you will need to flip the E6B over to the backside.
You will also need a pencil
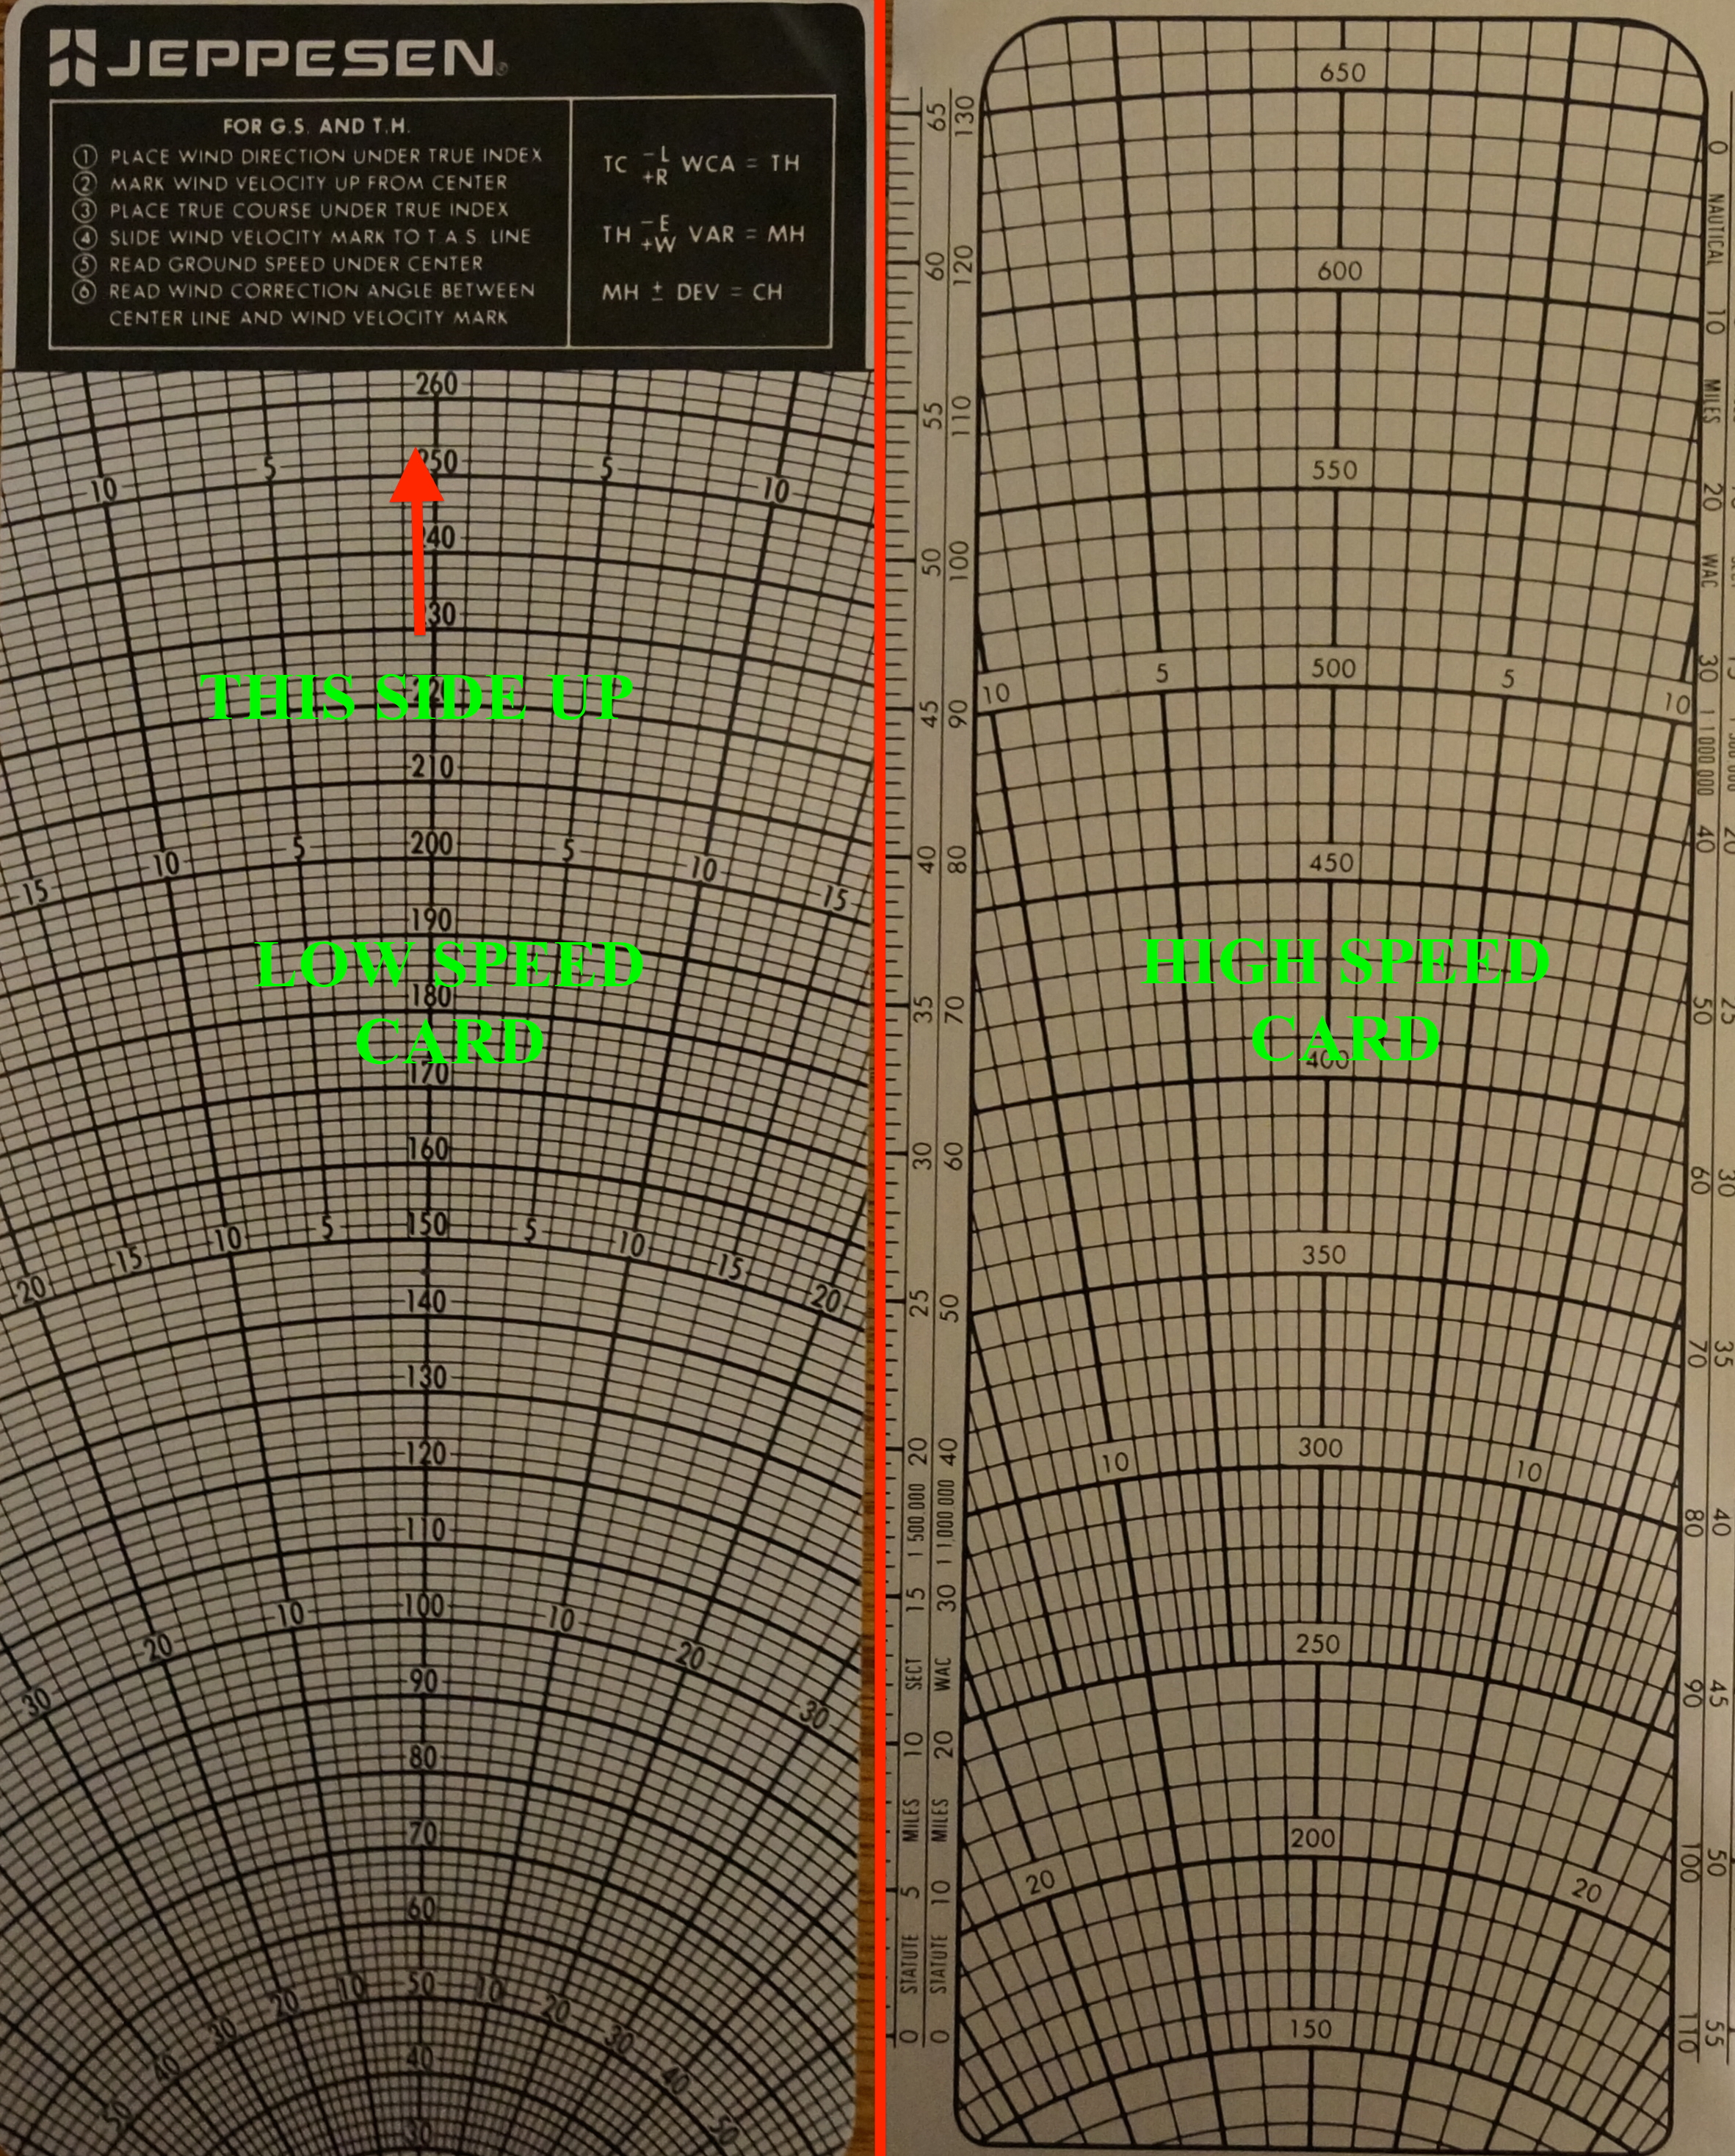
On the backside of the E6B, you will notice a rotating dial and a metal slider. The metal slider is reversible and has one side for low speed aircraft (like light training planes) and one side for high speed aircraft (like jets). Before getting started, make sure you are using the correct side and that your card is facing right-side up.
Now that you are oriented and have your trusty pencil, you can begin the process. Below are the steps:
For this example, I will use:
True Airspeed of 125kts
True Course of 070
Winds from 290@22kts
- Just like the Jeppesen instructions say, rotate the dial the place the wind direction under the true index (the little pointer on top).
- The instructions on the E6B are vague for step 2. The objective is to place a small pencil mark on the plastic pencil-friendly surface to identify the wind velocity. If you look down the center of the E6B, you will notice a bold center-line and some numbers from about 30 at the bottom to 260 at the top for the low speed card. You will also notice a grid which marks increments of 2 units between the numbers. These numbers and the grid will be used to reference speed later. For now they will be used as a guide to mark the wind velocity.
- Place the small hole in the center of the plastic directly over the “100” mark. For now, the 100 has no meaning other than to make it easy to count the wind units on the grid.
- Count the units upwards and place a mark on the plastic that corresponds to the wind speed. For example, for 22kts of wind, you would place the mark at “122”.

3. Rotate the dial to place the true course under the true index.
4. Now slide the metal slider so that the pencil mark you made lines up with your ground speed. In this example, this will mean that the mark will be left of the center-line.
5. Read the groundspeed corrected for wind at the center-line. In this example, the ground speed is 141kts
6. Find the wind correction angle by counting the units between the pencil mark and the centerline. In this example you will get about 6 degrees. If you pencil mark falls to the left of the centerline, subtract the value from your True Course to get your True Heading. If your mark falls to the right add the value.
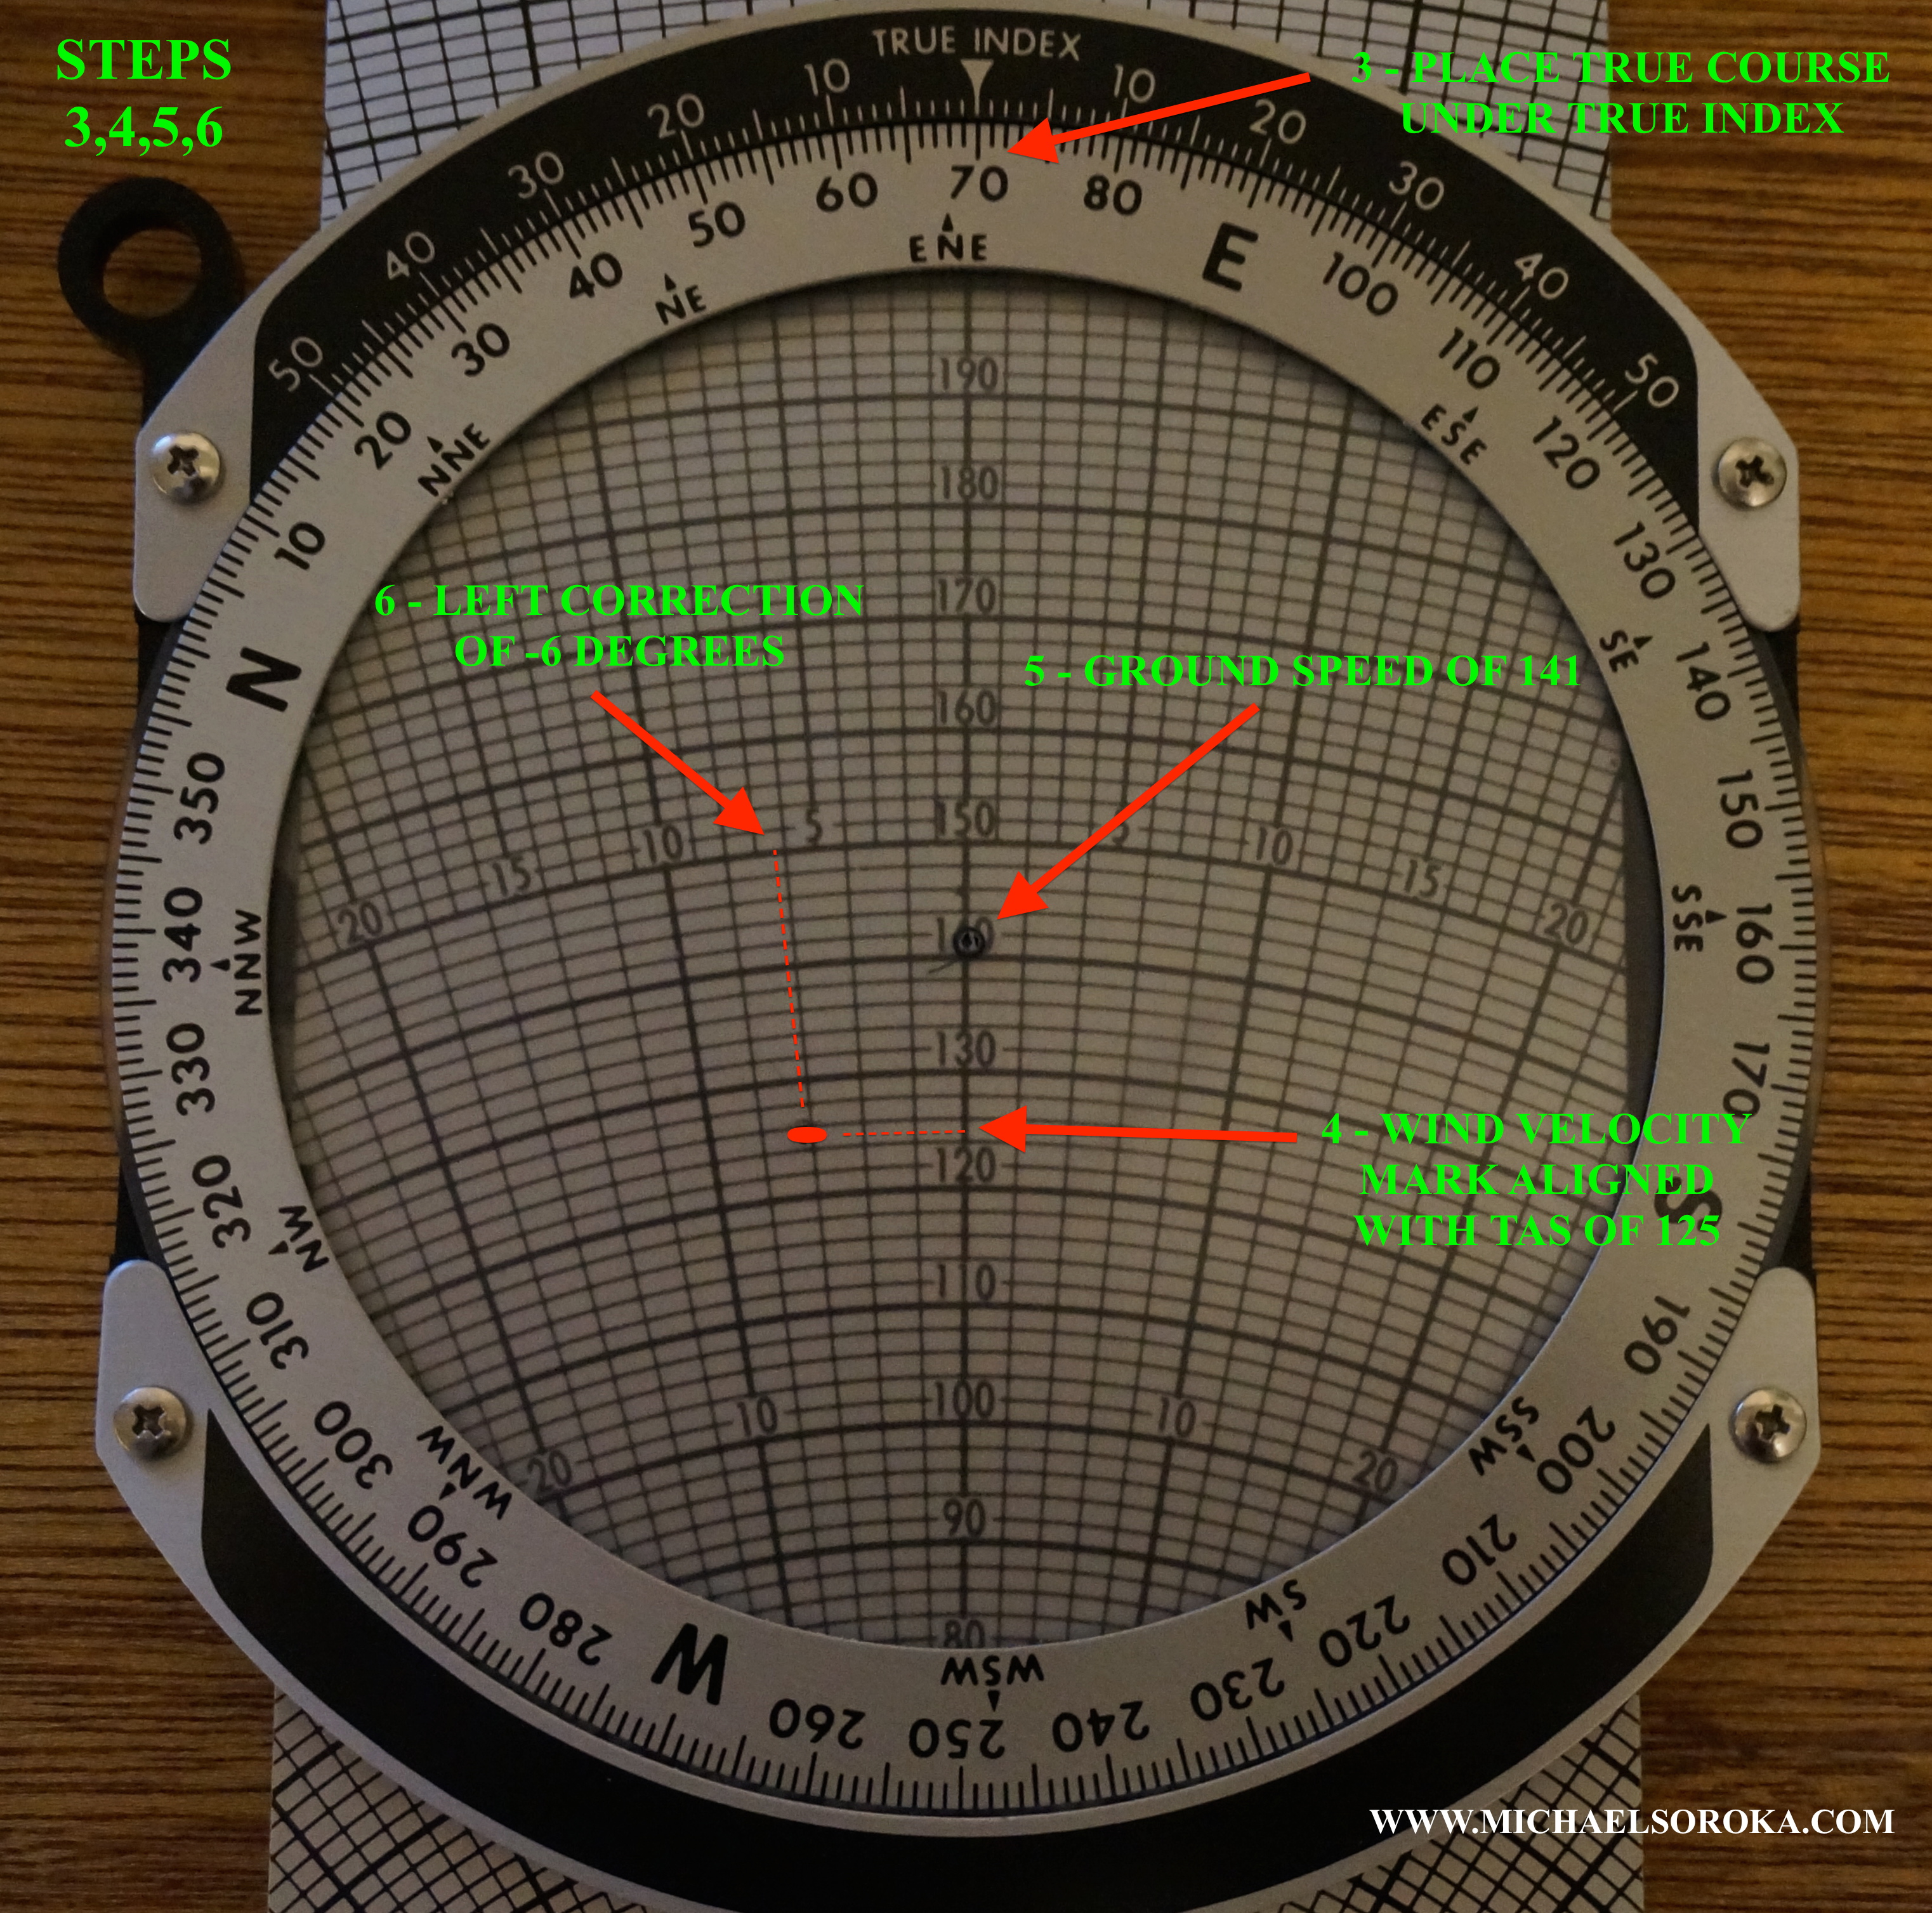
So after all of that, you should arrive at a groundspeed of 141kts and a True Course of 64 degrees.
3 – Other stuff (TAS, Density Altitude, and Conversions)
These problems will use the front side of the E6B
TAS and Density Altitude
Because the process for finding TAS and Density Altitude is the same, I have combined these two tasks into one example.
This process will use the Density Altitude window (center window) and Temperature/Pressure Altitude window (right-most window) along with the A scale and B scale.
To find TAS and Density Altitude, use the Temperature/Pressure Altitude window (right-most window) and align your OAT on top with your Pressure Altitude on the bottom.
- Read your Density Altitude off of the pointer on the Density Altitude window (center window)
- Find your CAS on the B scale. Your TAS is directly across on the A scale.
Ex: What is the Density Altitude and TAS under the following conditions:
PA- 15,000′
OAT- minus 30c
CAS- 150kts
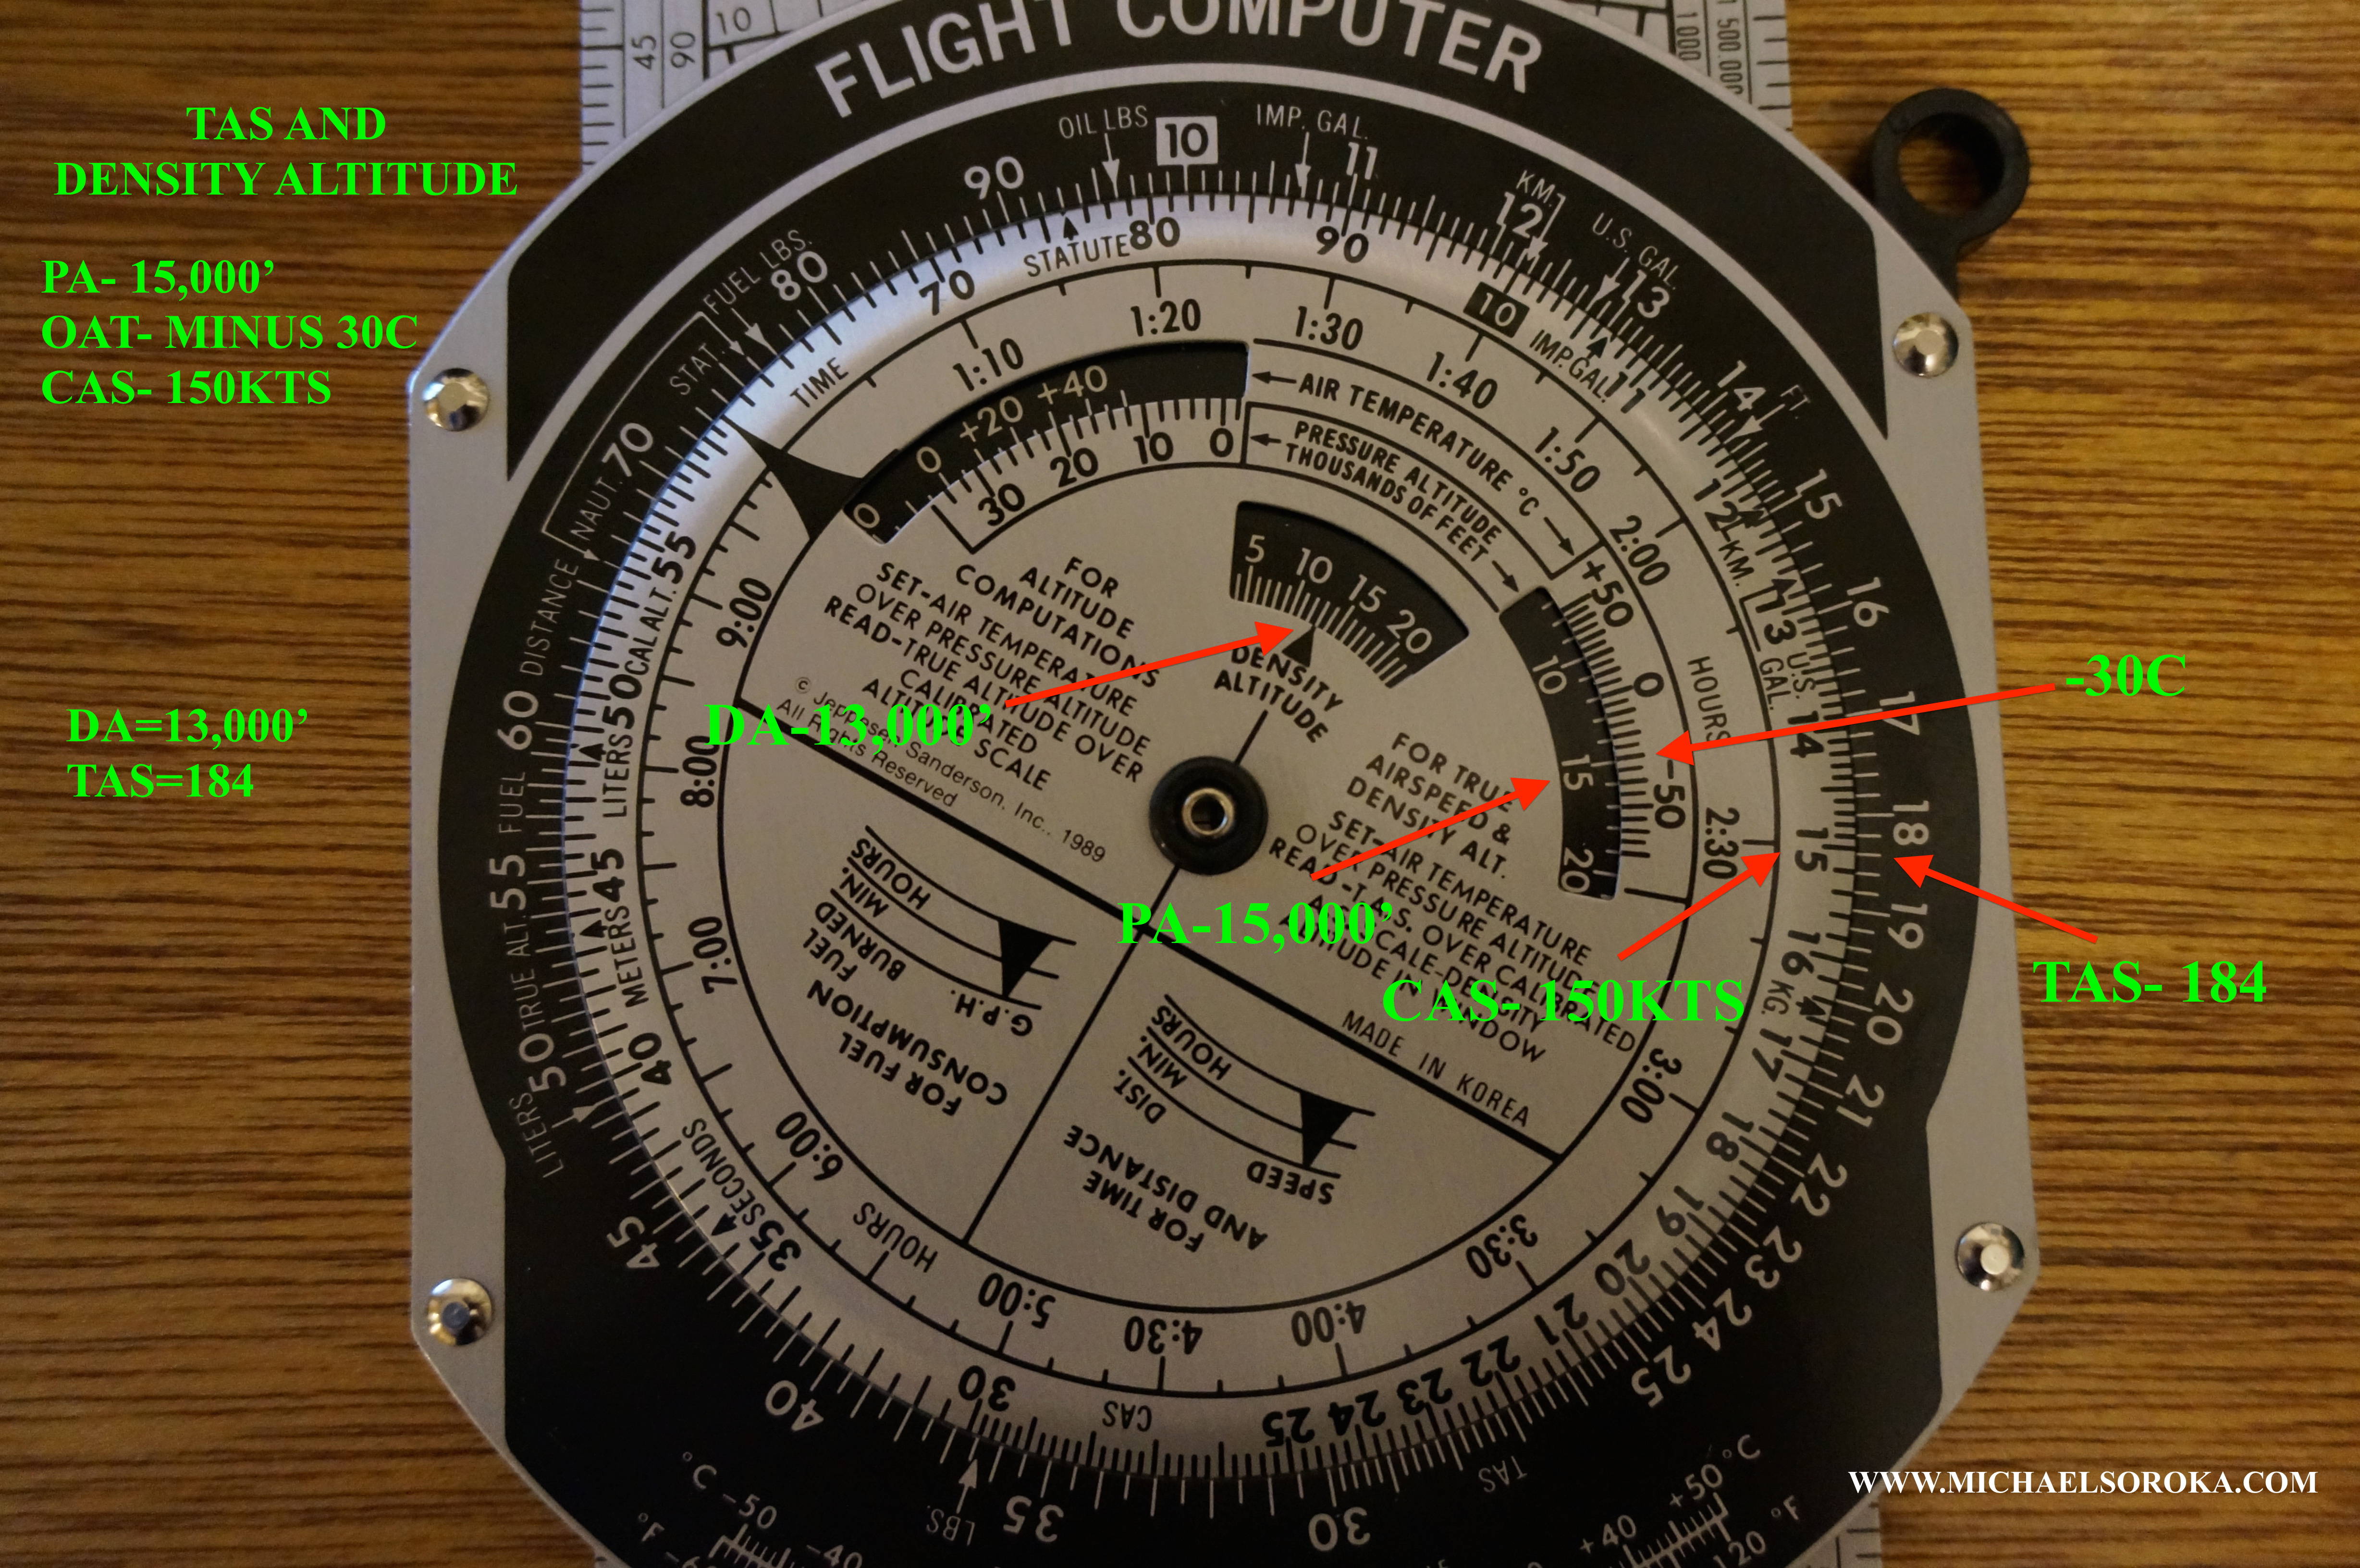
You should get 13,000’ and 184kts
Conversions
The E6B can do a bunch of conversions. Rather than outline each one, I have made a collage of sorts to highlight a couple:
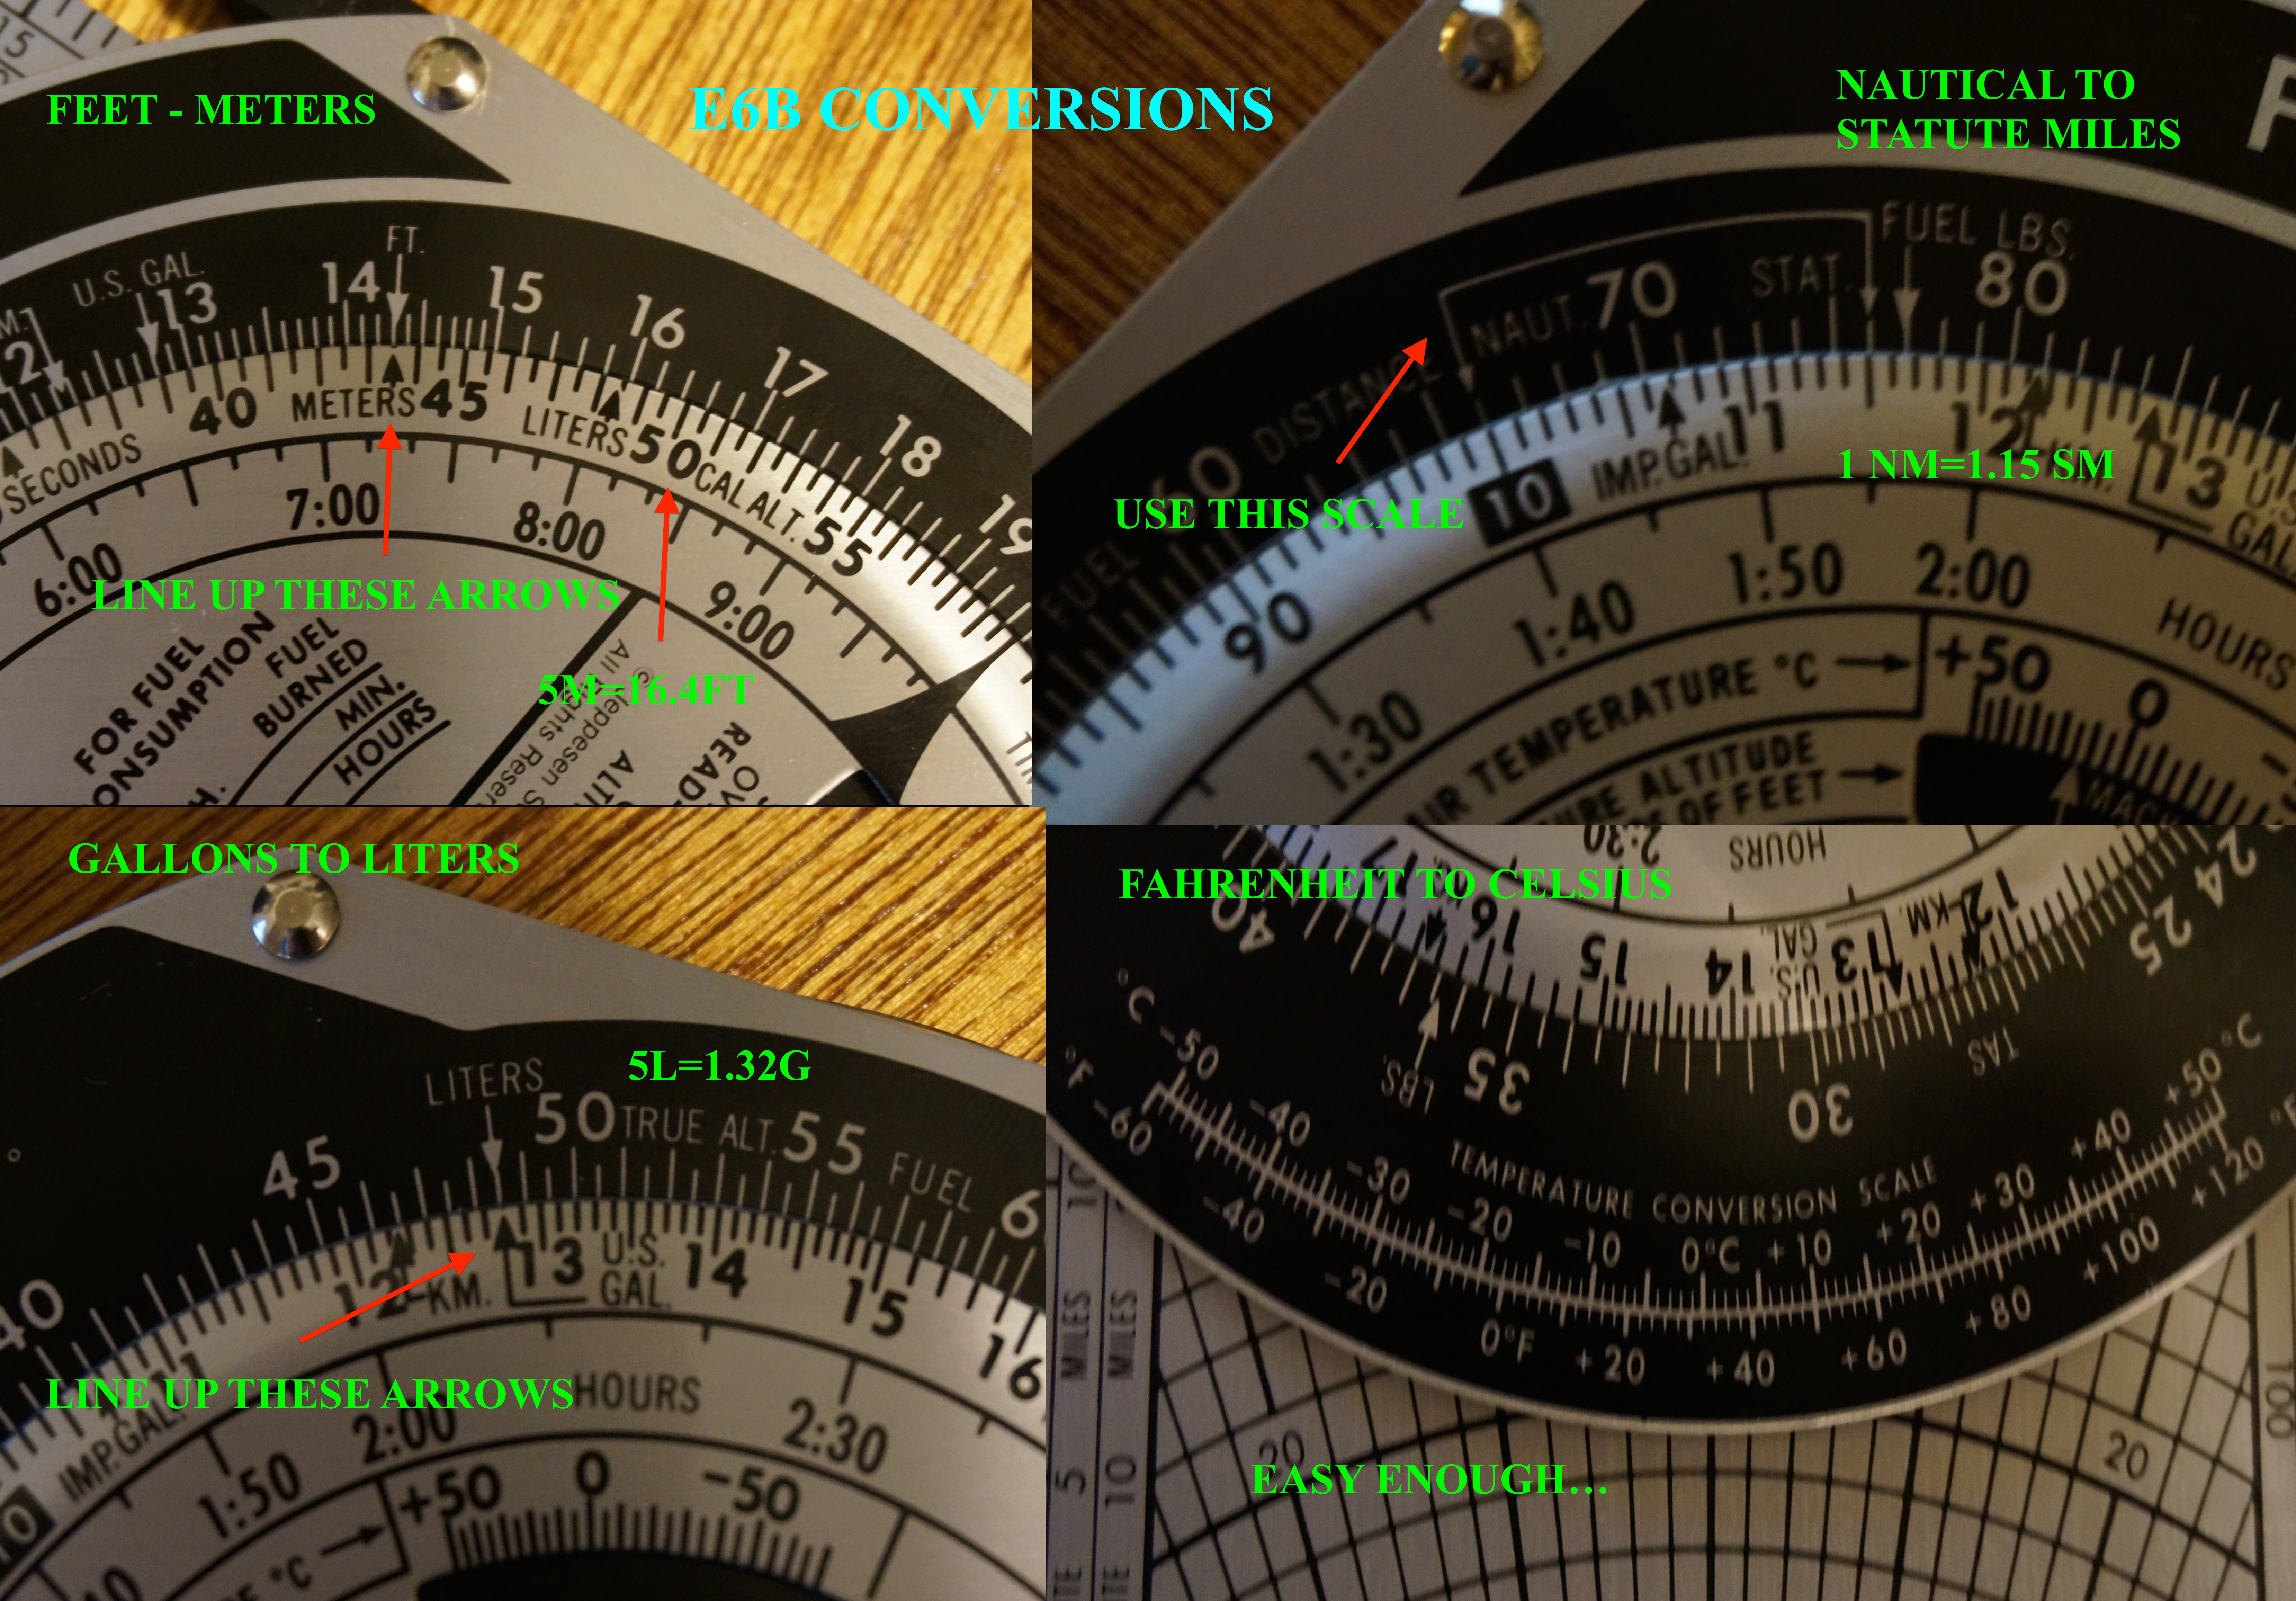
Hope this helps!
Remember, practice makes perfect. Im sure over time, you will find the E6B to be faster can a calculator.

I love my E-6b! The best feature is its lack of batteries. It works even when flying over the Ionian Sea when your iPad says “over heat – shutting off”. Pilotage and this computer is my favorite type of navigation. 🙂
Nice! I still keep one in my flight bag, even with the airlines. C to F conversion is a lifesaver for PAs.